• Discover new ways to elevate your game with the updated DGCourseReview app!
    It's entirely free and enhanced with features shaped by user feedback to ensure your best experience on the course. (App Store or Google Play)

Anchor protector / markers

MooseDrool

Newbie
Joined
Nov 6, 2009
Messages
9
Location
Greencastle, PA
DiscGolfColler.jpg


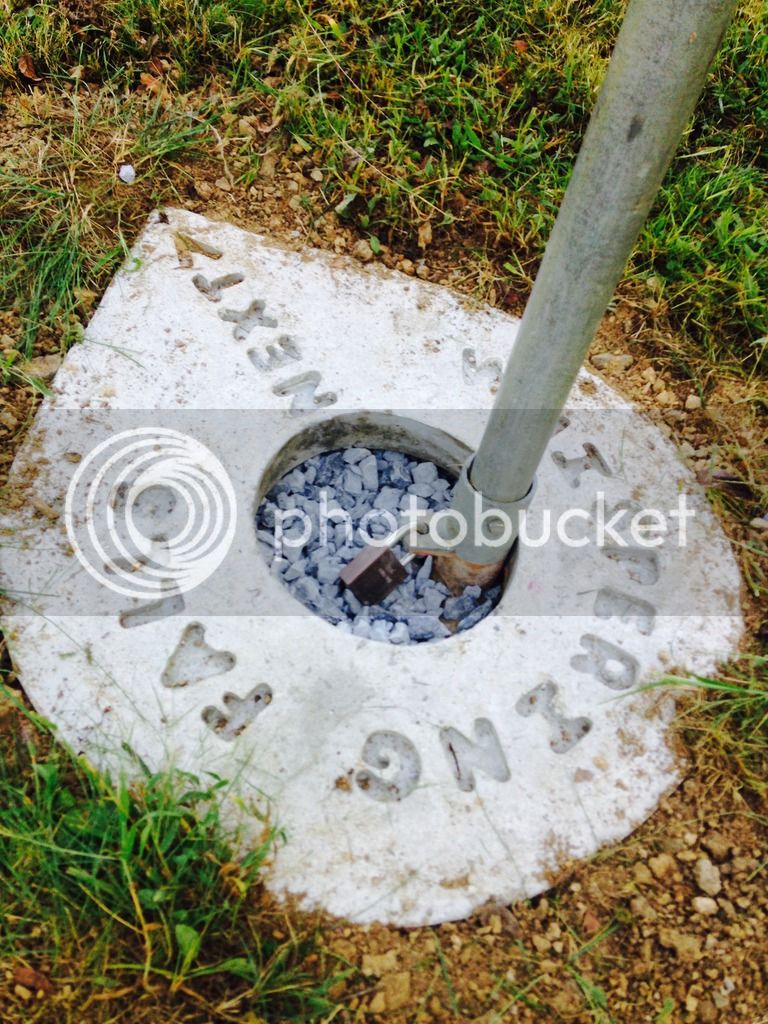
I made these to help point to the next hole and to prevent the mower from mangling the anchor. It also eliminates the need for weed whacking around the basket.
The cement is reinforced with rebar so the mower can ride right over it.

The letters are made from plastic molds I made by filling letter shaped cookie cutters with hot glue. When the cement sets, I just pry them out with a screwdriver. As you can see, the center voids of letters like A and P broke off with the letter. I am designing new letter molds that are thinner with bigger spaces.

The first holes to get these are the ones that have multiple choice anchors and are in danger of mower damage. The second holes are the ones that are hardest to navigate.

These are located at Whispering Falls Disc Golf Course in Greencastle, PA.

Weight: 80#
Cost: $10
 
Sweeeeet.
Did you make a mold and pour them somewhere else then install them when the concrete had set up?
 
I didn't make them, but MooseDrool kept me updated during the process.

How much time for 1? Surely cost is more then $10 considering labor but look really nice!
I believe the set up time took a couple days of messing around with it, but nothing extensive. Once the mold is created the only labor is mixing and pouring the concrete and then installing.

Sweeeeet.
Did you make a mold and pour them somewhere else then install them when the concrete had set up?
Mold was made at home and poured there, then installed once it was set.

How thick are they?
About 5 inches if I recall correctly.
 
Details

Actually, they are 3" thick using an 80# bag of concrete.
I made a mold from MDF, screwed aluminum flashing to it to make sides, formed an aluminum ring in the middle then lined the bottom with paper (MDF does not release from cement very well). Finally, I sealed all the corners with regular window caulk.

An 80# bag of ready-mix concrete is < $4.00 at Lowes, the 4' rebar was another $4.00 and the caulk was about a buck. I also sealed it with concrete sealer which is expensive, but a little goes a long way so, about another buck. Labor was free as I did it myself.

The mold did cost about $20 to make, but it is reusable so I didn't figure it into the cost/each.
I suppose if you made 20 of these, you could add another dollar to each for the mold.

I make them at home so I can seal the bottom and know that my letters won't walk away.
I could pour them in place, but then I'd have to change the mold to a form which would require a bigger hole and the bottom would not be sealed against the dampness.
 
How much time for 1? Surely cost is more then $10 considering labor but look really nice!

They take about 4-5 days from set up to placement.
2 days in the mold,
1-2 days to cure outside the mold (depending on the weather, it needs to be completely dry)
1 day for the sealer to cure.

I pour each one on Friday (my day off) and they are ready to go by the following Tuesday, unless it's too cold for the sealer (temp can't go below 50F) or raining (my garage is a mess so I have to do this outside).
 
One other note, the hole in the middle is about the same size as a disc so if I cut a pole sized hole in an old disc, it would make a pretty good cover for the lock, although, it will probably be taken within a few days.
 
Use melamine (particle board with the plastic outer skin, used for shelving, etc) boards instead of MDF and they won't stick.

It worked like a charm on my concrete countertop molds.
 
Use melamine (particle board with the plastic outer skin, used for shelving, etc) boards instead of MDF and they won't stick.

It worked like a charm on my concrete countertop molds.

That was my original plan, but the melamine panels were about $20 each vs $4 for the same size MDF.
However, to make a more lasting form, the $20 may be worth it.
 
One other note, the hole in the middle is about the same size as a disc so if I cut a pole sized hole in an old disc, it would make a pretty good cover for the lock, although, it will probably be taken within a few days.

My first thought was "who would take a disc with a big hole in it?" then I remembered that people will steal anything
 
My first thought was "who would take a disc with a big hole in it?" then I remembered that people will steal anything

We have hooligans around here too. Tee signs have been stolen/smashed/ripped off the post and just left on the ground. A rubber tee pad was pulled up and thrown into the creek, which let me tell you was a lot of work just to be a d-bag, those pads are heavy. We've had the cage broken on a basket, presumably from someone standing on it- all the welds were broken around the pole.

So yeah, I'd give an unattached disc a week tops before it walked.
 
Nice concept and execution. Might even be be able to pour the outer shape when you put the sleeve in and stamp the top.
 

Latest posts

Top