- Joined
- Jul 6, 2012
- Messages
- 1,316
This is a question that has grown out of my other thread about the course I just completed and its performance in its first tournament. I'll start out by sayting that I believe that part of the answer lies in a statistical analysis, but what I am looking for is a less mathematical and more intuitive explanation of what I should be looking for when trying to detemine whether a hole needs adjustment or tweakng (not HOW to tweak or adjust, but WHETHER to do so).
Much of my consideration of this was spurred on by jeverett, who did a statistical analysisi of the blue level (950 rated, or so) players and how they scored on the holes on that course, and to whom I am indebted. Also, some of my concern about that performance is also attributable to Steve West, with whom I disagree about most things par, but who nevertheless gives me much to consider on the subject of this thread.
One of the things that jeverett pointed out about my course was the performance of the different basket positions on a particular hole and its poor scoring spread width in one position and better scoring spread width in the other. The hole(s) are 17 and 17b. Hole 17 had 33.3% birdies and 66.75% pars. Hole 17b had 33.3% birdies, 53.3% pars and 13.3% bogies. Obviously, the better scoring spread width was seen by the "b" position due to the bogies.
The other hole that I wanted to consider from a conceptual standpoint was hole 6. Hole 6 is a gimmicky hole. It has a deep, OB creek within the circle, a few fee past the basket. The course is Kees Park if you want to look at photos of the hole. If you throw OB, there is a drop "spot," that is also just inside the circle, putting straight at OB. The reason for this drop zone was to give a high risk/reward opportunity to those who went OB on the throw and prevent a drop-in par to "reward" a poor tee shot. Conceptually, my thought was that an aggressive, very good throw would reward the player with a drop in birdie. A safe throw and easy lay up would allow a certain 3. A less than good throw by the aggressive player would result in and OB with the chance to make par with a gutsy putt, but with another OB penalty if you are OB on the putt. That was the idea.
So starting with the idea of scoring spread width, what is it exactly? I have been trying to figure out what I want out of a hole and I guess that what I am lookin for is one that requires a particular skill (or some creativity in the case of throws that I did not anticipte), and that results in some separation in scoring between those who make mistakes and those who do not. Should I be okay with a hole that results in 1/3 birdies and 2/3 pars. That strikes me as an okay result. Is it really better if the hole also forces a small number of bogies? Sure, I can see why, from a statistical standpoint, this is a better result, but is that more important than other considerations like the hole just being a fun one (as long as there was some separation in scores?
One of the first holes that I ever designed was a hole that was a dogleg right that began with a narrow fairway and was open after the dogleg. I made the hole too long. No mortal could reach it in two throws without divine intervention, and decent player could par it. It was a kind-of fun hole. Shortening it made possible to birdie and, as a result, more fun and more of a challenge. However, in tournaments, it tends to result in a few birdies and a lot of pars (I don't know the ratio off-hand). That hole has made me tend to equate "fun" with scoring spread to some extent. But danger, like on hole 6 (discussed above), also tends to equate to fun. Even my drop zone gimmickry drew no complaints from players at the tournament or locals who play it often.
What I used to look at the spread of scores was the Mean Absolute Deviation, because this looked like, to me, what I was trying to figure out with respect to a sort-of minimum performance of a hole. Why is that not the correct stat? Why is scoring spread width better? And am I wrong to think that 1/3 birdies and 2/3 pars isn't all that bad? This is certainly no criticism of that measure because I just really don't have a good enought grasp of that the different stats are telling me. But when I used the MAD to look at the scores, it told me roughly the same thing that the SSW told me with resped to the most problematic hole.
Another assumption that I am laboring under is that the lower the rating, the higher the SSW will be for any hole. Please correct me if I am wrong on this.
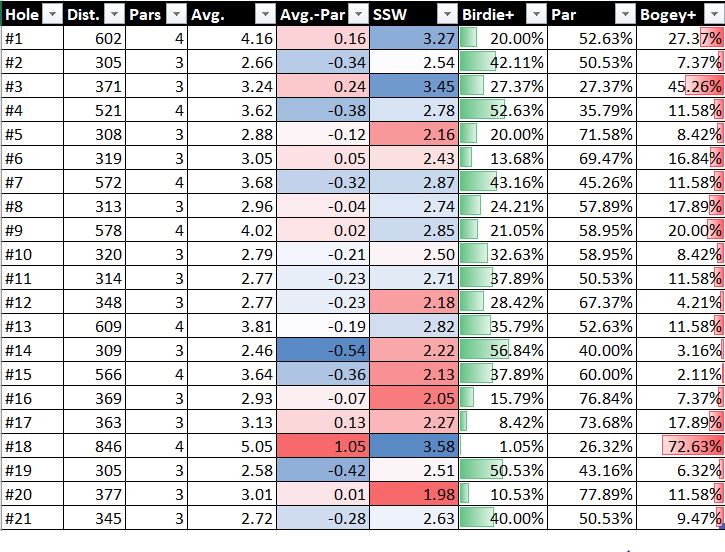
Finally, as I looked at the hole 7 stats, I saw a difficult hole with a decent width of scores but that was very heartening to me. There were few birdies. But the high number of bogies, to me, was an indication that the hole was encouraging better players to play aggressively and try for a birdie at the high risk of an OB throw. The reason I reached this conclusion is that this hole is an easy par for blue level players. Seriously, it is child's play to par this hole if you can throw over 200 feet with even moderate accuracy.
So if you guys can educate me on these issues (without resorting solely to mathematical equations), I would be deeply appreciative.
Much of my consideration of this was spurred on by jeverett, who did a statistical analysisi of the blue level (950 rated, or so) players and how they scored on the holes on that course, and to whom I am indebted. Also, some of my concern about that performance is also attributable to Steve West, with whom I disagree about most things par, but who nevertheless gives me much to consider on the subject of this thread.
One of the things that jeverett pointed out about my course was the performance of the different basket positions on a particular hole and its poor scoring spread width in one position and better scoring spread width in the other. The hole(s) are 17 and 17b. Hole 17 had 33.3% birdies and 66.75% pars. Hole 17b had 33.3% birdies, 53.3% pars and 13.3% bogies. Obviously, the better scoring spread width was seen by the "b" position due to the bogies.
The other hole that I wanted to consider from a conceptual standpoint was hole 6. Hole 6 is a gimmicky hole. It has a deep, OB creek within the circle, a few fee past the basket. The course is Kees Park if you want to look at photos of the hole. If you throw OB, there is a drop "spot," that is also just inside the circle, putting straight at OB. The reason for this drop zone was to give a high risk/reward opportunity to those who went OB on the throw and prevent a drop-in par to "reward" a poor tee shot. Conceptually, my thought was that an aggressive, very good throw would reward the player with a drop in birdie. A safe throw and easy lay up would allow a certain 3. A less than good throw by the aggressive player would result in and OB with the chance to make par with a gutsy putt, but with another OB penalty if you are OB on the putt. That was the idea.
So starting with the idea of scoring spread width, what is it exactly? I have been trying to figure out what I want out of a hole and I guess that what I am lookin for is one that requires a particular skill (or some creativity in the case of throws that I did not anticipte), and that results in some separation in scoring between those who make mistakes and those who do not. Should I be okay with a hole that results in 1/3 birdies and 2/3 pars. That strikes me as an okay result. Is it really better if the hole also forces a small number of bogies? Sure, I can see why, from a statistical standpoint, this is a better result, but is that more important than other considerations like the hole just being a fun one (as long as there was some separation in scores?
One of the first holes that I ever designed was a hole that was a dogleg right that began with a narrow fairway and was open after the dogleg. I made the hole too long. No mortal could reach it in two throws without divine intervention, and decent player could par it. It was a kind-of fun hole. Shortening it made possible to birdie and, as a result, more fun and more of a challenge. However, in tournaments, it tends to result in a few birdies and a lot of pars (I don't know the ratio off-hand). That hole has made me tend to equate "fun" with scoring spread to some extent. But danger, like on hole 6 (discussed above), also tends to equate to fun. Even my drop zone gimmickry drew no complaints from players at the tournament or locals who play it often.
What I used to look at the spread of scores was the Mean Absolute Deviation, because this looked like, to me, what I was trying to figure out with respect to a sort-of minimum performance of a hole. Why is that not the correct stat? Why is scoring spread width better? And am I wrong to think that 1/3 birdies and 2/3 pars isn't all that bad? This is certainly no criticism of that measure because I just really don't have a good enought grasp of that the different stats are telling me. But when I used the MAD to look at the scores, it told me roughly the same thing that the SSW told me with resped to the most problematic hole.
Another assumption that I am laboring under is that the lower the rating, the higher the SSW will be for any hole. Please correct me if I am wrong on this.
Finally, as I looked at the hole 7 stats, I saw a difficult hole with a decent width of scores but that was very heartening to me. There were few birdies. But the high number of bogies, to me, was an indication that the hole was encouraging better players to play aggressively and try for a birdie at the high risk of an OB throw. The reason I reached this conclusion is that this hole is an easy par for blue level players. Seriously, it is child's play to par this hole if you can throw over 200 feet with even moderate accuracy.
So if you guys can educate me on these issues (without resorting solely to mathematical equations), I would be deeply appreciative.