• Discover new ways to elevate your game with the updated DGCourseReview app!
    It's entirely free and enhanced with features shaped by user feedback to ensure your best experience on the course. (App Store or Google Play)

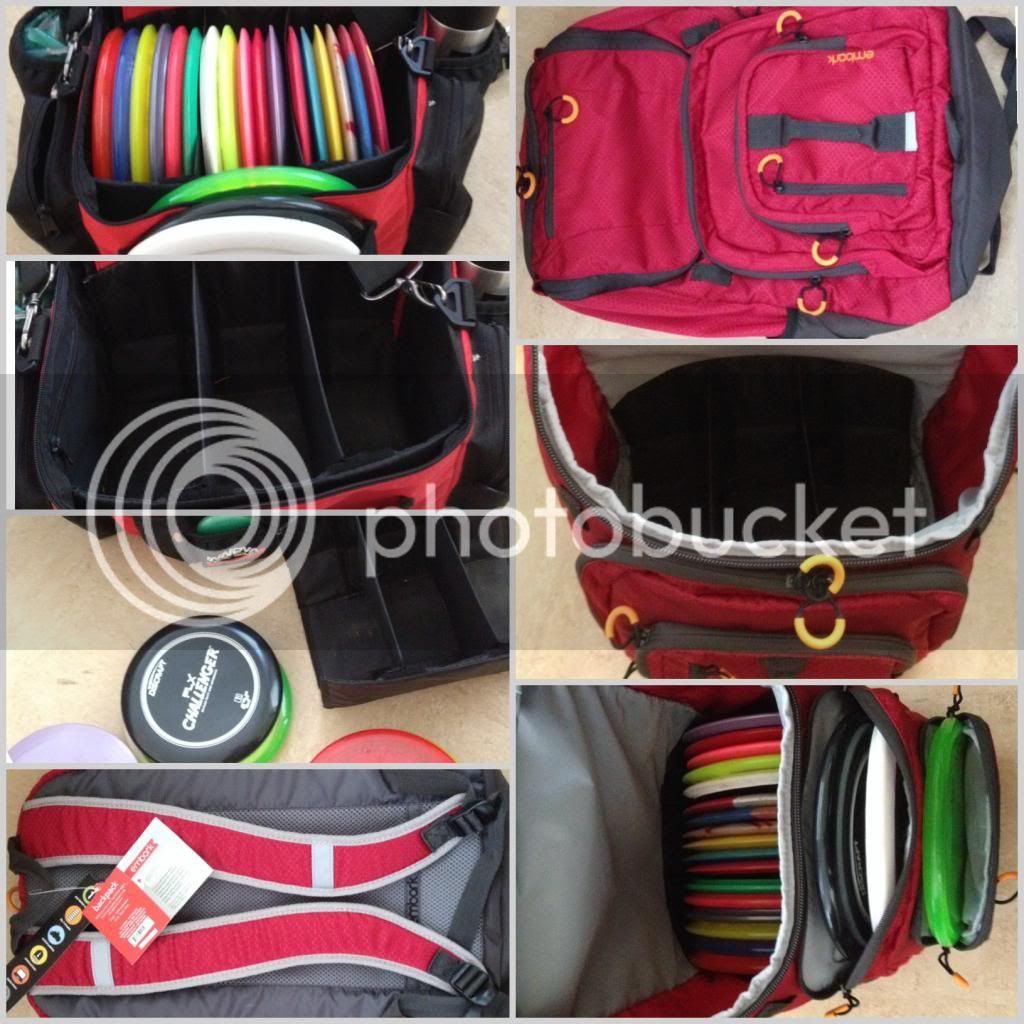
New DIY $25 Backpack Bag.

That looks really nice, Trizzor. If I buy one of these backpacks, I was wondering what I could use other than PVC to give a bit of structure to the bag and keep the discs standing up nicely. Corrugated plastic bend to a U cradle? Not sure how to bend it to shape, or get it to hold a shape though.
 
That looks really nice, Trizzor. If I buy one of these backpacks, I was wondering what I could use other than PVC to give a bit of structure to the bag and keep the discs standing up nicely. Corrugated plastic bend to a U cradle? Not sure how to bend it to shape, or get it to hold a shape though.

The frame, for me at least, wasn't to keep the bag's shape but to add some weight to the bottom so that it 1) stands better, 2) the discs dont rub the ground (wear to the bottom of the bag and discs getting wet).

But to answer your question, the best option would be to stop at a dollar store and grab a $2 plastic kitchen cutting board. That at the bottom of the bag would solve both issues I listed above. If you use corrugated plastic, I would layer it twice at the bottom for more durability. The shape of the bag itself will keep the discs upright, no need for the U cradle.
 
Would someone be nice enough to post the measurements you used for the frame?
 
Bought one today. I put a piece of cardboard in the bottom, don't think I need to do anything else really. I don't know if it's awesome or sad how well this thing works. It has me looking down on other companies and how much they charge us for DG bags.
 
Would someone be nice enough to post the measurements you used for the frame?

Here is the setup I used. This is the length of the PVC cuts, prior to assembly.

Width 10.5" (left to right): Quantity 2
Height 9.5": Quantity 4
Depth 3.0" (front to back, bottom): Quantity 2
Depth 2.0" (front to back, top): Quantity 2
L-Elbows (90˚, top): Quantity 4
Y-Elbows (90˚x40˚x40˚, bottom): Quantity 4

Now, after reading that you've probably realized I don't have matching depth on the top and bottom. I did this because the bag does not rise straight up near the top, it slants inward. That is why in the pictures of my frame, you can see a very defined slant. I did not want the top so deep that it put stress on the seams of the bag.

-Trizzor
 
Thanks for the quick reply man. I just picked up a grey and green one this afternoon and am going to give it a shot.
 
dude, this is killin me..i went to two Targets. one had the white bag with light blue stripes, etc. then, there was the pink one at the other Target:thmbdown:. ugh. not good. i will have to order online.
 
dude, this is killin me..i went to two Targets. one had the white bag with light blue stripes, etc. then, there was the pink one at the other Target:thmbdown:. ugh. not good. i will have to order online.

Lol yeah... I found a navy blue one that was on the wrong hook, otherwise I would have ended up with a plaid-ish white and aqua colored one.

In a way all the color options make these bags even better.

I've been eyeing backpacks all summer, this one is no-lose, so a big thanks to the OP for finding a DIY that requires essentially no work if you want to use as is. I'm a little concerned about the durability but only time will tell.
 
I spent an extra $10 to get this bag, and its awesome!

After seeing this post yesterday, i went to my local target hoping to snatch this bag on clearance with no such luck. I shifted through the backpacks and found the typical ones in this thread, but then i saw this version, and it was the last one of them, but it was $10 more. ($35) They had a bunch of similar priced ones called the elite, but this one must have been older or something, as it was kind of hiding and the only one left that i could find... from the looks of it, it looked perfect, and i'm happy i bought it. I took out my dividers from my innova bag, and it fit perfectly into this backpack so i didn't have to use any pvc. Feels great on my back, and once i play a few rounds i will report back. I am even thinking about sewing in an extra spot on the back of the main compartment where i could hold more discs. Definitely worth the 35 bucks.

 
I picked up the grey cheveron one at my local target today for $25. The only one of this model which was on sale was raspberry color, for $17.49, but it looked a tad girly to me so I SPLURGED on the $25 bag. I figure the dark bag will also hide stains and mud better anyway. Surprised at how lightweight this bag is. To make the straps long enough for me, I think I'll have to loosen them nearly as far as they will allow. I didn't look at the labeling yet, but obviously the backpack was intended more for school kids than full-grown men. Can't wait to load it up and try it out! Stoked on the original post.
 
Picked up an embark "jartop" backpack from my local Target, they had a bunch available but I went with the blue/grey one. I then went to home depot to grab up parts for the frame.

Here's the breakdown of parts:
1. embark backpack (24.99)
2. 10 ft of pvc 1/2'' (1.19)
3. 4 90º elbows and 4 T's /w male adapters (5.99)
4. 2 cans of plasti-dip (8.99)

So all in all I spent about $40 with gas and parts, not too bad! We will see how it all holds up.

Fist impressions of the bag:

Pros-
1. The bag is lightweight, and reasonably affordable
2. Fits discs in nicely with a pvc frame
3. Holds a 32oz nalgene easily
4. Extra storage for other discing essentials. I'm planning on doing a rainfly/poncho in the laptop sleeve. Other than that I have my mini marker, a sharpie, bottle opener, scorecards and bandaids. The backpack has hoops for carribeaners as well and I have my towels hooked on them. More room for other things in the top pocket as well.

Cons-
1. Pretty cheap construction, curious how it will hold up to disc course abuse, especially near the bottom where the straps connect

Other than that I am pretty satisfied so far with this thing, it sits up higher on my back than my mojo/quad setup which I really like, and is surprisingly lightweight. Can't wait to test it out! I have dimensions for the frame if anyone is interested... Could have made it a little longer to fit 1-3 more discs most likely but didn't want to stretch the material too much. Thanks for the awesome idea!

Pics-
1. In the first pic you can see everything I used to make the bag in my garage in about 1hr. Thankfully I found my pvc cutters haha.. hacksaw was not going to "cut" it for this job ;)

2. Second pic you see the internal frame, I tweaked it a few times to get it to fit how I want and saved the dimensions if anyone is interested.

3. Here you can see the bag fully loaded with everything I carry on a day at the course. I want to velcro that top flap so it can roll up out of the way, and I still need to plasti-dip the bottom. Also looking for ideas to connect a stool/unmbrella.

I have 17 discs including two putters in the front, and could probably fit 2 more putters in the front and another mid/two drivers in the main.
 

Attachments

  • diy bag 2.jpg
    diy bag 2.jpg
    148.1 KB · Views: 324
  • diy bag 3.jpg
    diy bag 3.jpg
    138.8 KB · Views: 312
  • diy bag 1.jpg
    diy bag 1.jpg
    113.1 KB · Views: 430
Where the shoulder straps connect seem to be suspect. I'm not that concerned with the bottom wearing out before those separate. Tough to complain when it is essentially a bag you could replace every season and still save money.
 
Yea it is fairly cheap constrction and I am worried that it will tear where the straps connect at the top and bottom. But it is cheap enough to replace!
 
I know a lot of us, all have been using 1/2 PVC, but you could also use 1/2 CPVC, it's a little smaller, tan in color, could give you a little more room and cut down a little more in weight. Just not sure if you can find the 3 way connector. If you have trouble finding the three way connector you can use 4 more elbows and add 4 "t" connectors at the bottom.

I have a Fade Crunch Bag I like a lot, and comparing it to the backpack doesn't feel that much difference in material. Cutting a small cutting Board and maybe screwing some feet to the bottom would make it last longer on the bottom. Also If you don't one strap it all the time it should last longer then if you hold all the weigh on one strap all the time.
Now you got me thinking of using 1/8" delrin and forming a "U" shape insert into the bag. Have to see if I have a long enough piece of Delrin .
 
i think lowes will cut the pipe for you if you need it
 
Last edited:
stoked. just ordered the blue Jartop Embark with orange trim. will be buying the pvc pipe and connecting pieces this weekend. :clap:
 

Latest posts

Top