Sorry for all the questions...
What's the advantage of having a plotter if you have to hand-cut a lot of multi-color dyes? What's are some tricks for lining up your hand cuts on a disc (say you want a seamless transition between colors in different color groups with little to no overlap?) Can you shine a light through almost any discs to see these points?
This may help. On most of my recent multi color dyes I've started using both dip and shaving cream[not marbled].
I pre cut almost everything, apply vinyl, weed black areas, here's where I start playing thing by ear, if the design isn't that detailed and the vinyl went on smooth[no creases near rim cuts etc.] Dip, peel, dip, peel.
this was all pre-cut, dipped, no remask. When I'm working on a disc, it's not uncommon for me to kinda wander around the house, disc in hand,
burnishing the cut lines with my finger/fingernail and double checking the weeding and getting my dye together.
If it's a crazy design[I'm currently working on hand-cut digi camo] and or the vinyl didn't go down very well and I don't trust floating it or I need just a spot of color, I'll mix 1/4 tsp. powder rit[more or less depending on intensity and coverage area] and about 1/2oz. hot water with enough shaving cream to not be runny. Usually I mix the dye,squirt a shot of SC in hair dye applicator bottle then add the dye mix and sir with kabob skewer. This allows me to work the dye/sc on the top of the disc face up. Solid colors, isolated marbleing, I've had pretty good results with small area gradients by putting down a bead of SC and slowly pushing it out over the area with a tooth pick. You can also work different colors at the same time.
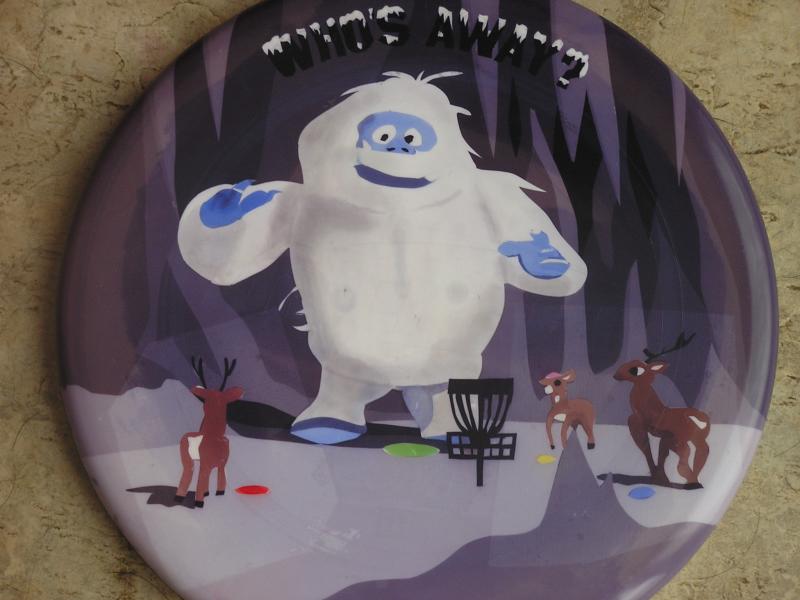
All hand pre-cut. All of the ground,back and fore ground is black dip,probably 5-6 dip and peels,1-5 min each. Unfortunately you can see where I got lazy re-masking around the reindeer and the contact paper pulled some of the background dye.:wall: The deer, discs and blue on the bumble were SC on top of the disc. The shadow/shading on the bumble was my 1st try at painting w/acetone.
Kinda rambling and slightly off question but hopefully it helps. Good luck