• Discover new ways to elevate your game with the updated DGCourseReview app!
    It's entirely free and enhanced with features shaped by user feedback to ensure your best experience on the course. (App Store or Google Play)

Marbling agents

Definitely Iberian, except lets skip Kanza (short and kinda boring) and go to the glory that is Kansas City Disc Golf. If you have ever played WYCO you may want to come and give it one last go, they suspect it will be removed by early summer.

Yeah that is a shame that it will be gone.. I def want to get together with some DGCR guys and play some KC courses
 
Dan - been reading this thread a few times and finally decided to try this out.

Can you clue me in to how you get the dye to sit on top? Is it simply a matter of a thin tipped applicator and doing it slowly? I tried with some shampoo airline bottles, but when I put the dye on the SC bed it sinks in and colors the shaving cream.

It still worked, but my disc came out more like marble/granite patterning instead of the oil-paint swirls you have going on. I'll post a pic later.

I'm also experimenting with mixing shaving cream into the dye in a small airline shampoo bottle, then pouring it on top of the disc and letting sit. I'll post pics of that probably tomorrow after it has sat for a while.

Thanks for enlightening us all on this cool method.
 
You wanna use small amounts of dye so it does not liquify the shaving foam. If you look at dans how to pics he is using a syringe to apply the dye. I've found the less dye the better in this method
 
I'm still struggling with color intensity, every step seems to involve diluting the dye a little more but here's what I'm doing at the moment.

For the bed an SC water mix that I have yet to measure :eek: 
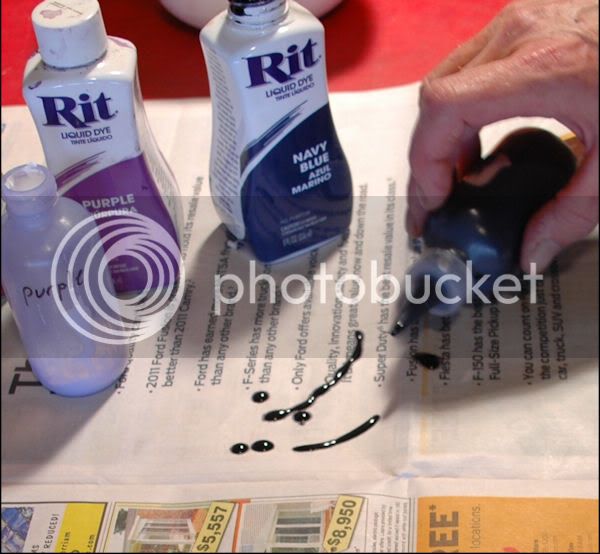
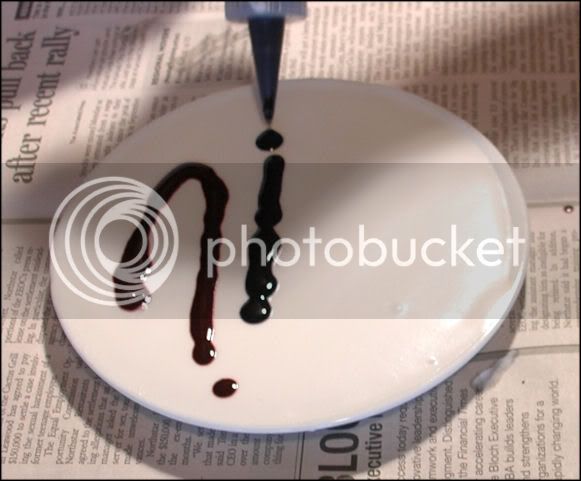
probably about 2cups SC to a half cup water, mix and adjust with more water till ya get soft peaks. When you pour it should look something like this
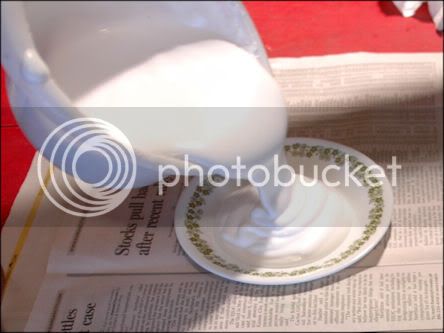
SCbedDSC_6777.jpg


I'm using 4oz squeeze bottles (used to be what perm solutions came in, you might be able to pick up a bunch at a salon). Add a little shaving cream then liquid dye, shake to mix and adjust the consistency with more dye till it stands a little off the newspaper like this
dyeSCDSC_6773.jpg


If the mixes are good you should be able to then do this
linesDSC_6783.jpg


NoThingness I'm glad you are trying to get straight dye to work but I have a hard time with the marbling that way. I want to try getting more dye in solution starting with the powder, I know there are saturation limits but i kinda doubt Rit has maxed out the liquid dye.
 
This is a friggin' genius idea. Read this last night. Went to the dollar store on my way into the shop this morning. Got 2 cans of shaving cream, and 2 plates. Got a dye soaking as we speak. Cant wait to see what it looks like in the am. Your latest tutorial definitely should prove to be helpful. Will post a pic of my first experiment with this tomorrow.
 
GL hippie, for tests i was using saucers. You can get 4 tests outta one disc if you do the bottom!
Also, and I'd luv to hear opinions on this, i didn't see much difference between 4hrs and 12 hrs.
 
Just a thought, but have you tried some sort of heat application after setting the disc? I suspect the MW might have bad effects on the shaving cream stability, but how about a heat application to the upturned underside of the disc...hair dryer..etc? I haven't gotten around to trying this method yet(I have the supplies but no time!) so I don't know if this would help, but maybe worth a try. Heat makes all the difference in a regular dip, so maybe it'll help here too?
 
we tried heating the disc by sticking it in warm water before the shaving cream and all that did was cause the disc to sink through the foam in a short amount of time :wall::wall:
 
So, here's the results of what I worked with today:

Like I said earlier, my applicator was a bit thicker than Dan's. It makes it tougher to get precise swirling patterns, so an altogether different look - but not bad IMHO.

My steps (just for clarity):

1. Fill plate with layer of shaving cream - I held the Barbasol further away from the plate and it curles into little ringlets that expand pretty evenly and make it easier to smooth out.

2. Water/Powder Dye/Acetone mix in a small airline/travel shampoo bottle. The kind you have to press one side of the top to get the little spout to pop up/open - not the straight screw-tops.

3. lay out dye on shaving cream in straight parallel lines. Multi colors seem to work best if you have a primary then spot fill a secondary - 50/50 comes out muddier.

*Note here - 80% of the dye soaks into the foam and looks like colored shaving cream, a little stays on top but not much, which probably is why it looks different than Dan's - still trying to achieve exactly what he does.

4. I used a toothpick to "mix" the colors - I push the toothpick all one way, and sometimes if the colors get too on top of each other I lift a little corner of clean shaving cream and put it in the middle, then mix the white of the shaving cream in with the colors.

5. Plop the disc down, push a tiny bit so you see the foam spread, not too much though or you'll push thru the foam.

---Results---
1st pic is top - I did the Oregon one first and it was a little muddy with the 50/50 mix of colors, so I went 66/33 for blue/silver on the Duke one.

2nd pic shows I marbled the rims too for extra practice and an extra little touch.
 

Attachments

  • IMG_0574[1].jpg
    IMG_0574[1].jpg
    148.1 KB · Views: 759
  • IMG_0575[1].jpg
    IMG_0575[1].jpg
    104.9 KB · Views: 497
Heres my first result. Turned out like a pink marble. Cool effect but the color intensity was not really there. Think im going to try an acetone or alcohol dye mix with a lil thickener mixed in. Should have time to experiment more in the coming days.
blookazoo1.jpg
 
Nice work guys, Tacoma I like the Oregon green granite, the other one I have a hard time looking at :D, hippie its a cool effect nonetheless, and its makes me think that straight dye powder on SC might look pretty cool too! Keep experimenting, Barbasol is $1.35 @ the dollar store.

Here's one I did a little while back but was sick of posting my mistakes at the time, how could you get it any more off center :wall: Shows marbling and faux gradient in the sunset, after about 30mins in i gave the disc a good push down into the SC and it smeared nicely.
 

Attachments

  • sidewinder fish1 DSC_6498.JPG
    sidewinder fish1 DSC_6498.JPG
    67.7 KB · Views: 517
  • sidewinder fish2.jpg
    sidewinder fish2.jpg
    72.8 KB · Views: 546
Nice work guys, Tacoma I like the Oregon green granite, the other one I have a hard time looking at :D, hippie its a cool effect nonetheless, and its makes me think that straight dye powder on SC might look pretty cool too! Keep experimenting, Barbasol is $1.35 @ the dollar store.

Here's one I did a little while back but was sick of posting my mistakes at the time, how could you get it any more off center :wall: Shows marbling and faux gradient in the sunset, after about 30mins in i gave the disc a good push down into the SC and it smeared nicely.

i think it looks really good off center, like your looking into the scene, i like it man great work
 
Very cool Dan, makes me want to give it another try, see if I can't get some better results.
 
Nice work on the fishy dye Dan! That thing looks sweet. Heres another I let soak over night. Didn't use any acetone or thickeners on this one. Gonna try that today. Still lacking in color intensity but I think a pretty cool effect was achieved.
marbleyion.jpg
 
ok, my turn to have a go at it!
here is my set up
and I will post results tomorrow after it sits about 18 hours
 

Attachments

  • IMAG0065.jpg
    IMAG0065.jpg
    98.6 KB · Views: 556
  • IMAG0066.jpg
    IMAG0066.jpg
    82.9 KB · Views: 472
  • IMAG0064.jpg
    IMAG0064.jpg
    89.4 KB · Views: 581
Oh, that Ion is just... I'm sorry, I need to go change pants.
 
Nice work on the fishy dye Dan! That thing looks sweet. Heres another I let soak over night. Didn't use any acetone or thickeners on this one. Gonna try that today. Still lacking in color intensity but I think a pretty cool effect was achieved.
marbleyion.jpg

This almost looks like real marble stone was used, it is great!
 

Latest posts

Top