I wrote this up a while ago. I'm waiting to start a thread with it until I get some pictures to go along with it, and links too for that matter.
Dyeing a disc is much more simple than it sounds. The supplies can be found at any craft store (i.e. Maichaels, Hobby Lobby, JoAnn Fabric) or even Wal-Mart or Target. The only thing that may not be found at those places is the Acetone, but that is at any hardware store.
The stuff you will need is:
Acetone and cotton balls
X-acto knife
Sign Vinyl or Contact Paper
Transfer Tape
RIT Fabric Dye
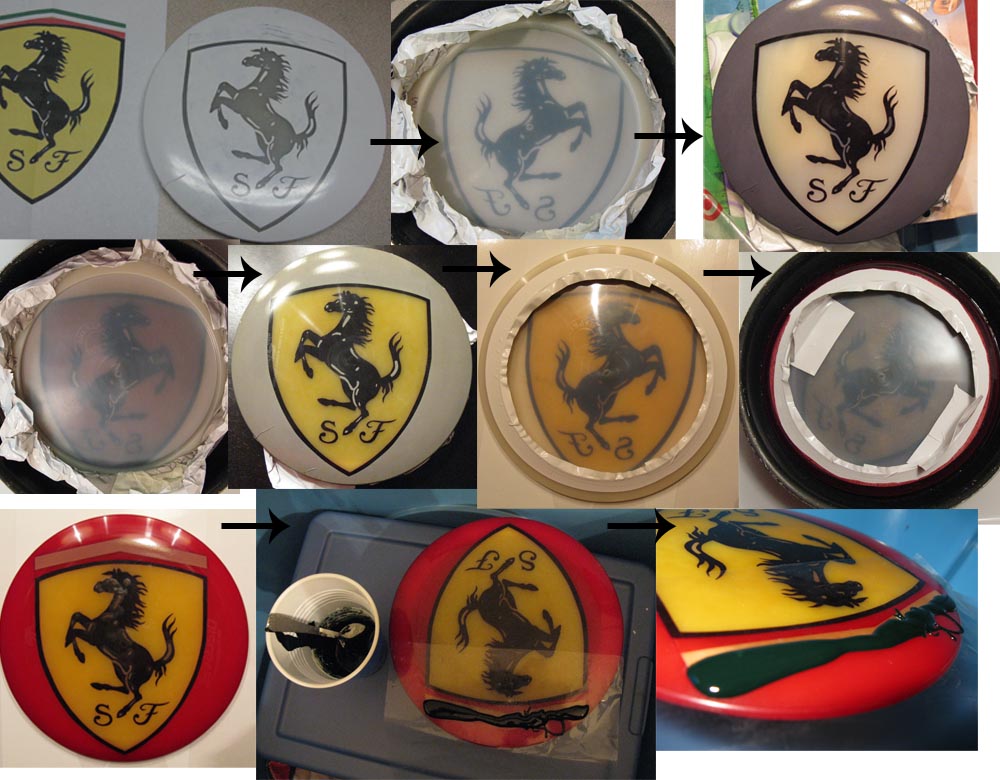
Step 1: Picking a design and Disc
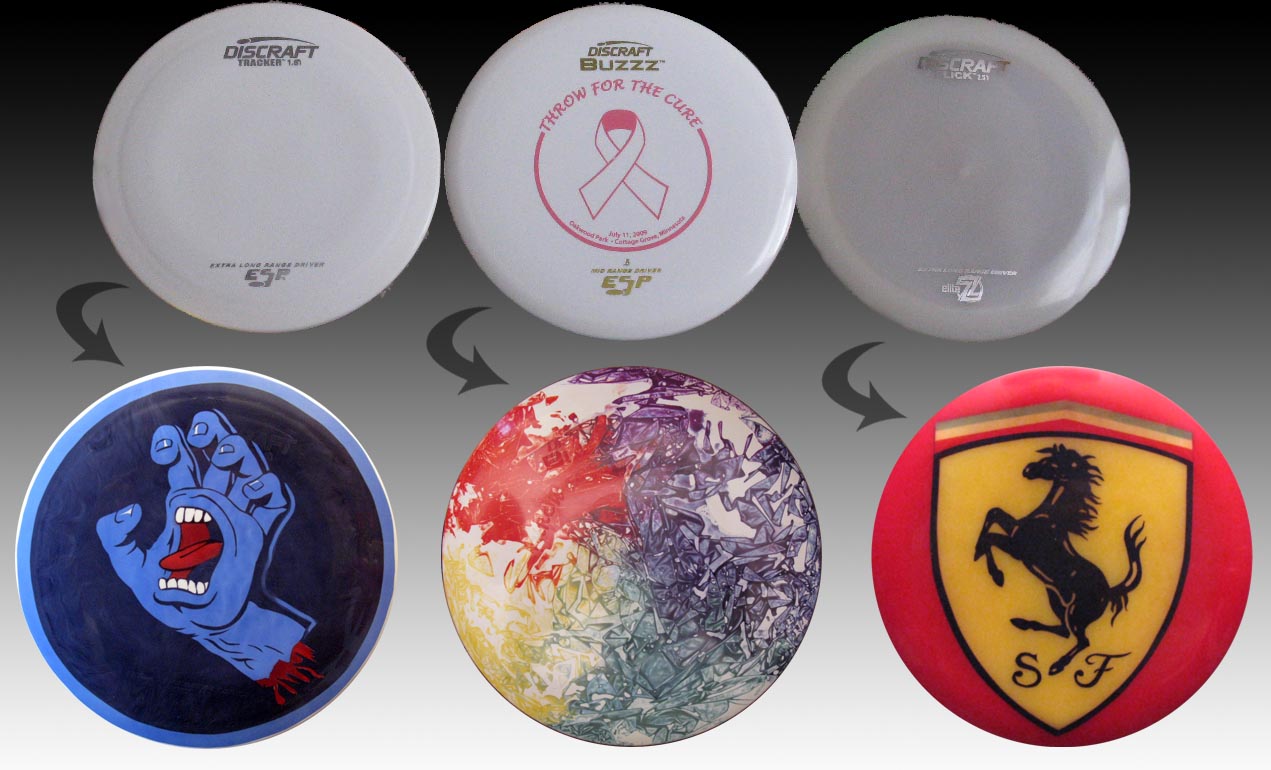
Probably the hardest part of dyeing is deciding what you want to dye and which disc it on. This is all personal choice. However, there are some things you do need to know. Such as the fact that DX, and Pro D plastics are not worth dyeing. The dye just doesn't get into the plastic very well. Second, Discraft stamps are more of a pain to remove than Innova stamps, especially ESP and FLX. Champion and Star plastics are really your best options when dyeing. Also, you can't dye a colored disc white so sometimes it is best to start with a white disc.
Step 2: Removing the Stamp
The easiest of the steps. Simply go to your local hardware store or big box store and in the Paint section is Acetone. It is basically 100% nail polish remover. You are going to want to use the Acetone in a well vented area as it will make you a little light headed if you breath too much of it. And this stuff will eat through plastic so don't put in a plastic cup or use cheap plastic gloves. I just makes it go everywhere.
Start by pouring some Acetone on a few cotton balls (paper towels work too, but not as well as cotton balls and a large bag of cotton balls is about $1)and slowly wipe the stamp off. Try not to pour the Acetone right on the disc and the colors in the stamp will spread and those are a pain to get off. It will shock you who easily the stamps come off. Except for black stamps on white ESP discs (shutters). Those are more of a pain than they are worth. Just use a white Star disc.
Once you're done, rinse the disc off under running water and wipe clean. Viola! A clean disc.
Step 3: Cutting and Weeding Your Design
Now that you have a plan for what you want to dye and your disc is ready to go you can begin making the stencil. There are a few different ways you can go about cutting the design onto the vinyl or contact paper (from here on out I will assume you are using vinyl, but you can use either one and contact paper is much cheaper). First, you could have someone on the forums with a plotter cut out the design for you (for a fee, of course), but most people like to cut their own. To do that you can either draw the design on the vinyl if that's your thing or you can put the design underneath the vinyl (if you can see through it) or on top of the vinyl and trace it that way. Whichever way you do it, use just enough pressure with the knife to cut the vinyl but not the backing, only because it dulls the blade. Once you have the image cut out, remove (or "weed") the pieces of vinyl that you want to show through on the disc. These are the areas of the disc that will receive the dye.
Step 4: Putting the Vinyl on the Disc
This is the most stressful part of the process and the most crucial to getting a clean dye with no bleeds. You have one shot to put the vinyl on the disc because pulling it back off the disc is not an option. To begin transferring the image Place the transfer tape over the cut and weeded image. What the transfer tape does is keep everything in place when the backing of the vinyl is removed so that everything is in order, including floating pieces and things of that nature and you are not placing those pieces by hand. Once the transfer tape is covering the image use a small squeegee or an old credit card (what I use) to make sure the tape is firmly adhered to the vinyl.
To remove the backing on the vinyl peel it away from the vinyl at a 180 degree angle. By this I mean that place the image face down and peel the backing in the direct opposite direction going as slow as possible. Keep an eye out for pieces to remain stuck to the vinyl backing as this can lead to rips, tears, and missing pieces of the image.
Now that the adhesive of the vinyl is exposed you can place it on the disc. What I prefer to do is when using a transparent disc to leave the image face down with the adhesive exposed and facing upwards and the place the disc onto the vinyl. Now that the vinyl is on the disc, wrap the excess vinyl around the edge of the disc to make sure no dye gets to the bottom of the disc.
Now comes the most important part of the process to ensuring a clean dye: eliminating bubbles. Take the aforementioned squeegee or credit card and make sure the vinyl is completely on the disc and that there are no bubbles of air near any of the cuts. If you were careful in how you put the vinyl on the disc then there should not be too many bubbles to worry about, but there will always be some. Simply take the squeegee and push the air bubbles towards the cuts to completely eliminate them or simply push them away from the cuts into an area where they will cause no harm. This is usually about 1/8 of an inch away from any of the cuts. Once you confident that you taken care of all bubbles, it is time to dye.
Step 5: Dyeing the Disc
After all the work you just put into preparing the disc for dyeing, the actual dyeing process can seem downright easy. Take your RIT fabric dye and put a full packet into a pan on the stove with about 1-2 inches of water. You can get a pan at Wal-Malt for $5-8. Be very carful as the dye will stain things in your kitchen. Heat the dye and water mixture until it is simmering while stirring it to ensure that the dye it fully dissolved in the water. Once the dye is simmering, turn the heat to the dye and let it cool to a point wear you can place you hands on the side of the pan and it is still warm to the touch but not so hot that you cannot comfortably keep your hands there. If the dye is too hot you can melt the vinyl or mess up your disc.
Once the dye is at the proper temperature take the disc and grip the excess vinyl that is coming on the underside of the disc. Place the disc into the dye at an angle to ensure that no bubbles floating on the surface of the dye attach themselves to the disc. This causes the disc to have perfect little circles of undyed disc. Once the disc is in the dye tap the disc lightly a few times to loosen any bubbles that may have gotten onto it. If you are really picky, like I am, take the disc out of the dye and see if there any bubbles. Once the disc is safely back in the dye let it sit for 10-20 minutes defending on how dark you want the color to be. If you want to leave it in longer I would suggest taking the disc out of the dye and heating the dye back up the temperature and then putting the disc back into the dye. Do not heat the dye while the disc in the dye because of the what I mentioned before about overheating the disc and vinyl.
Once you are satisfied with the color you achieved rinse the dye off the disc and peel away the vinyl. Use running hot tap water to help take the vinyl off the disc to prevent having the vinyl leave a sticky residue on the disc.
And Viola! A custom dyed disc that you can be proud of!
Make sure you rinse and wipe the disc clean and let it sit for a few hours before you do anything with it to prevent the dye from transferring to anything else, like other discs, the countertop, and fabric that you don't want dye on. You can store the leftover dye in a mason jar if you so choose. The dye lasts a long time and you can get a lot of discs out of one packet of RIT.
If you want a video tutorial you can always check out YouTube. I know they have a bunch of stuff on there too.
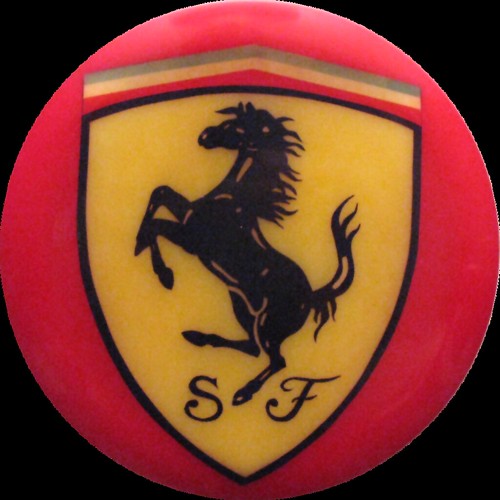
") Any interest in selling that Ferrari disc?
Any interest in selling that Ferrari disc? 