• Discover new ways to elevate your game with the updated DGCourseReview app!
    It's entirely free and enhanced with features shaped by user feedback to ensure your best experience on the course. (App Store or Google Play)

Rail lines with Discs and thumb/wrist placements

rhatton1

Double Eagle Member
Silver level trusted reviewer
Joined
Aug 4, 2011
Messages
1,183
Hi,

I am not sure how to embed pictures to the forum if anyone could help that would be great.

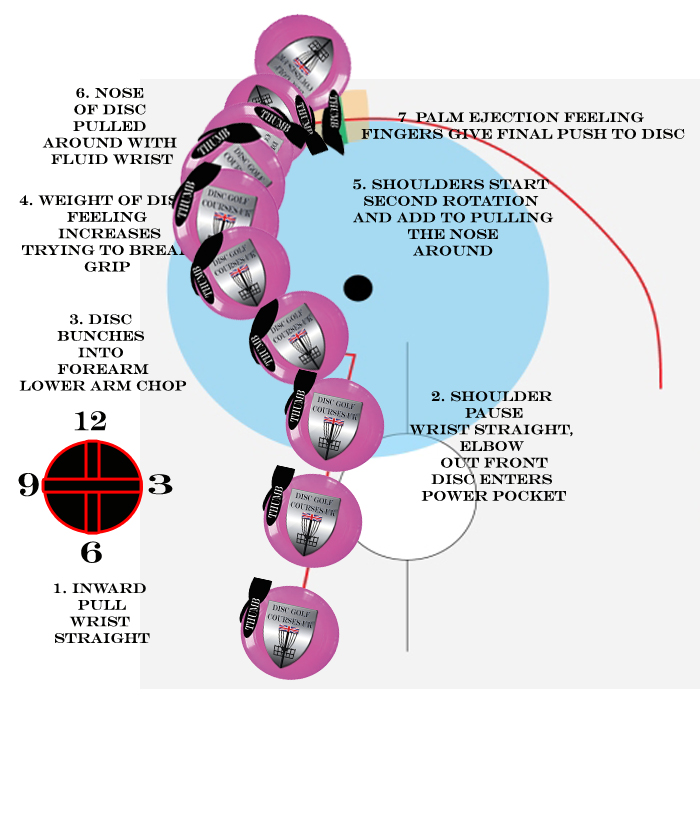
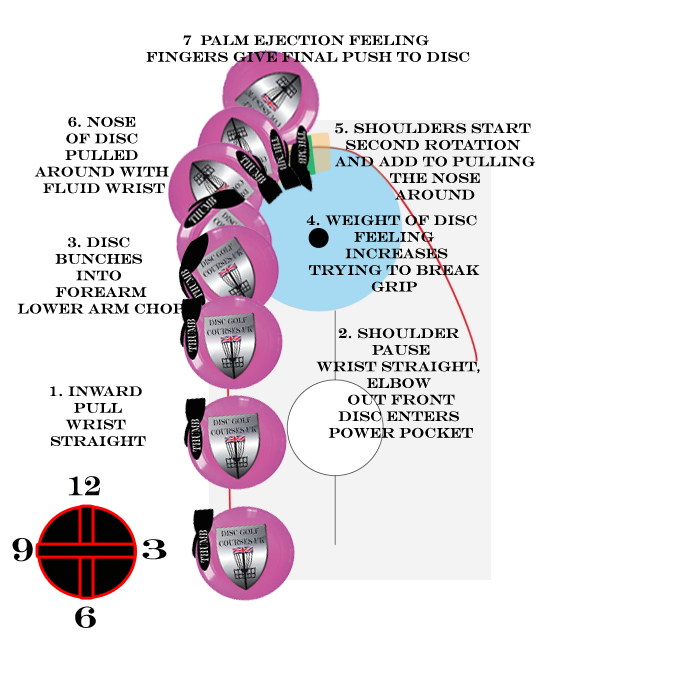
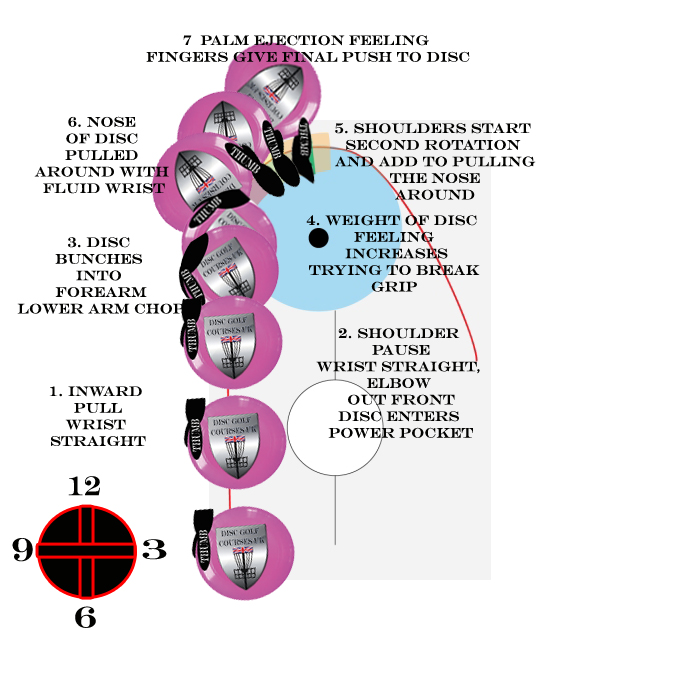
Over the last few days/weeks here and on Reddit there have been a number of questions regarding hand placement on the disc, what the wrist should be doing etc, stealing Blakes rail lines I have added a disc with thumb and wrist (badly drawn!) approximate positions for the Beto rail, the average good line and the shoulder spinner (i've overemphasized this to be the typical beginners throw we all know.)

Hopefully it will help people to visualize the lines - I've knocked this up quickly this morning whilst at work (shshh!) so let me know if you see any glaring errors or anything you would add.

http://i.imgur.com/5P7IpUn.jpg average Good line
http://i.imgur.com/fuMtDBu.jpg Beto rail line (the line I'm liking at the minute)
http://i.imgur.com/8JIXKkl.jpg rounding/shoulder spinner line

Edit* Would you look at that I'm not as thick as I thought I was - pictures embedded below!
 
8JIXKkl.jpg
Rounding Shoulder Spinner

fuMtDBu.jpg
Beto Rail

5P7IpUn.jpg
Average Good

This might work hopefully!
 
Realised rounding wasn't quite right so redrew
pRvlueV.jpg
 
This is a nice improvement on the originals. It shows the wrist movement clearly. I also like that you showed the disc stamp rotating which again emphasizes the curl or jam caused by the momentum before the leverage occurs.
 
Do you think I have the wrist opening up slightly too much as it bunches up? This is probably a bit more loose than fluid thinking about it, I'm tracing the lines myself and I don't think I get quite that much passive curl.
 
I meant closing up not opening, the opening is about right.
 
I think it makes the point. It's going to vary from person to person anyway, but the key thing it's showing seems clear to me.
 
I am not entirely sure there is a perfect way to draw these pictures, but I do love the detail in these. Good work.

I am planning for extensive work this off season. I am curious to see what actually cones of it.
 
The thumb and/or hand bones should be on the rail line coming in, and then the tip of the thumb should be on the outward arcing rail line. The thumb shouldn't be pointed past 11-12 o'clock until the disc is gone, otherwise it's griplock or early release depending on where the disc actually goes. The pics are also missing the disc pivot which is responsible for some of the outward arcing of the disc path and the thumb stopping forward and not reversing away from the target. The thumb should be moving forward through impact, but not much past.
 
Ah damn, you're right, there needs to be a separation of disc from hand trough the pivot pushing the disc out slightly - good spot- that's why the thumb is over opening as otherwise it wasn't getting to 4 o'clock on the disc, I need to draw another hand/wrist thumb position to show the pivot.

I got a little lazy with trying to place the thumb/hand accurately on the line all the way through, will tidy up tomorrow. To begin with I had twice as many discs so the line was pretty much blocked but I took a lot out as you couldn't really see clearly.
 
These should be better, thanks for the input as always Sidewinder - I have moved the whole disc out slightly which gives more room to see what is happening and they now include the disc breaking away through the pivot.

TzBYIBH.jpg

Rail line

LrCXmh1.jpg

Good average

It does suddenly make the motion look even more powerful and you can see why the grip strength to hold the good line through to the hit needs to be so strong where the Rail can be more achieved through good timing without quite the same necessity on grip.

Glad I did this now its a better illustration than I was originally expecting.
 
I know this is going to be a stupid question, but what is the difference between the two pictures? Also, is there other information I should read before trying to comprehend these?
 
This is where you need HUB to write an informative blog post to make sense o it all!

On phone at the moment can someone share the link to the myth of the disc pivot on DGR which explains the rail lines pictured.
 
7ef807257d5f5a58da02c1f81f432f70.jpg


when i look at your disc diagram, i see a series of forces and vectors very similar to what would happen with an efficient trubuchet. it's really helpful.
 
Edit* Annoyingly the Avery GIF doesn't really show this very well as his thumb never completes to 12 and the separation of disc from hand happens earlier than I have it - i'm sure there is a final frame missing from that GIf that happened faster than the frame rate picked up where the thumb slings to 12 ish and the pivot completes with his thumb breaking from the disc at about 4 oclock.
 
Hmm, looking at the Beto down video as well the pivot actually starts slightly earlier than I thought so I may have to redraw again, the disc starts coming away from the base of the hand somewhere between the 4th and 3rd to last discs in the sequence above which I suppose makes sense, it starts pivoting the second the thumb points past about 9 oclock.
 
MI0fJgm.jpg


An arc within an arc.

It was talked about on DGR so often in different ways but I don't think I had ever quite properly conceptualised it till now , wowsers.

As the disc breaks from the hand and begins the pivot the rail Blake drew with the disc attached as above clearly shows another arc on top of the original wide arc drawn. Huge power from a tiny motion.

This gets better every time i redraw it!

Clever man that Blake.
 
jGnnS6d.jpg


normal line, shows quite well why it is harder to hold onto through the hit than the Beto rail.
 
Top