-
Discover new ways to elevate your game with the updated DGCourseReview app!
It's entirely free and enhanced with features shaped by user feedback to ensure your best experience on the course. (App Store or Google Play)
You are using an out of date browser. It may not display this or other websites correctly.
You should upgrade or use an alternative browser.
You should upgrade or use an alternative browser.
Disc Golf Cart Pictures and ideas
- Thread starter jtrod
- Start date


DarkAce1978
Par Member
Latest mods to my diy cart
I installed a phone holder for scorekeeping and video recording shots, drink holder and 2 outside slots for holding frequently thrown discs. I wasn't sure if I would prefer this cart over a bag but after using it for 6 months, I much prefer it as long as the terrain is reasonable. Bonus points if you can figure out what disc was sacrificed to make the disc slots.(should be pretty easy to figure out)
I installed a phone holder for scorekeeping and video recording shots, drink holder and 2 outside slots for holding frequently thrown discs. I wasn't sure if I would prefer this cart over a bag but after using it for 6 months, I much prefer it as long as the terrain is reasonable. Bonus points if you can figure out what disc was sacrificed to make the disc slots.(should be pretty easy to figure out)
Attachments


I installed a phone holder for scorekeeping and video recording shots, drink holder and 2 outside slots for holding frequently thrown discs. I wasn't sure if I would prefer this cart over a bag but after using it for 6 months, I much prefer it as long as the terrain is reasonable. Bonus points if you can figure out what disc was sacrificed to make the disc slots.(should be pretty easy to figure out)
How heavy is your cart? Did you put a Condor on each side?
DarkAce1978
Par Member
How heavy is your cart? Did you put a Condor on each side?
I would estimate 30 to 40 lbs with 20 discs in it. And 1 Condor cut in half makes 2 perfect sized disc slots on each side of the cart.
Casey 1988
Shun the frumious Bandersnatch!
I would estimate 30 to 40 lbs with 20 discs in it. And 1 Condor cut in half makes 2 perfect sized disc slots on each side of the cart.
Condor works if you have an old Condor sized disc or bigger too worn in to use for play/dinged up, I just hate wasting a new disc this way unless I had one lying around that I was not using.
I suppose any big diameter disc like a Condor or bigger could work. I personally would use a Discraft Sky-Styler for my disc as it is about the same size as a Condor yet deeper so I could fit two driver/shallow midrange discs those pockets. The bonus is I can't use a Sky-Styler as the disc is too smooth on parts of the disc to work for throwing until a Sky-Styler is worn in a bit. I tried using a newer Sky-Styler for a throw and catch disc but it was not very good.


Part 1: Long post warning...
I have been wanting to make a DIY cart for some time. I decided to take the plunge and started making one. This is what I have so far. I'll preface with: I like the structure/look of the Delta. The Zuca does nothing for me. My opinion.
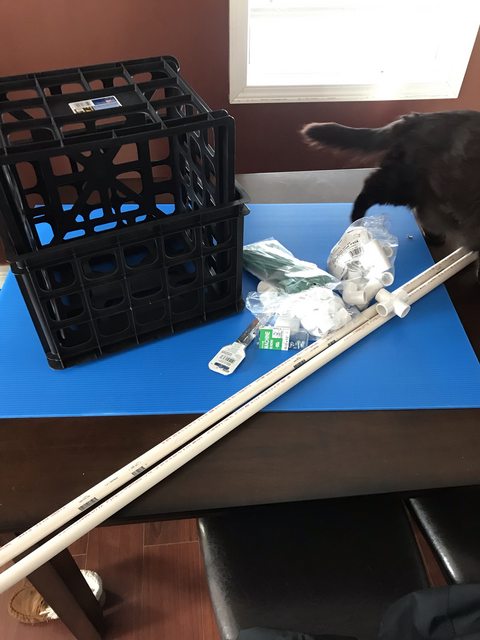
I started with a couple baskets I found at Menards. The dimensions were on par for what I wanted the size to be. Also some PVC (not used yet, might end up not...), corrugated plastic board, foam, plastic sheet, etc. Sisnoot (the cat) was neither leased from or purchased at Menards. Used materials, so far, amount to ~$60. I still have to get the wheels...
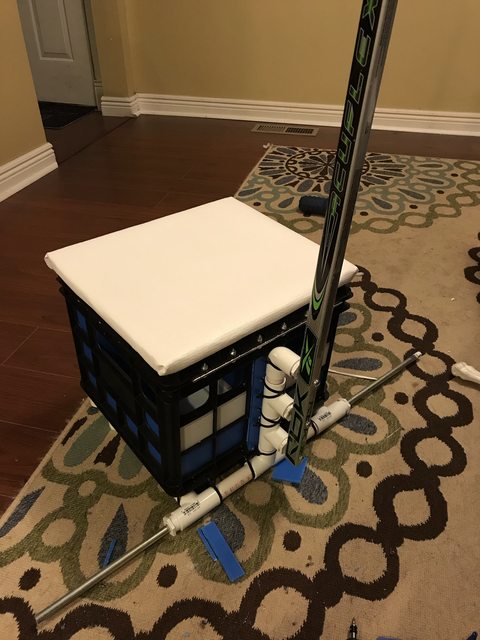
About a week later, I have the beginnings of a main compartment
If interested, here is the Lowdown:
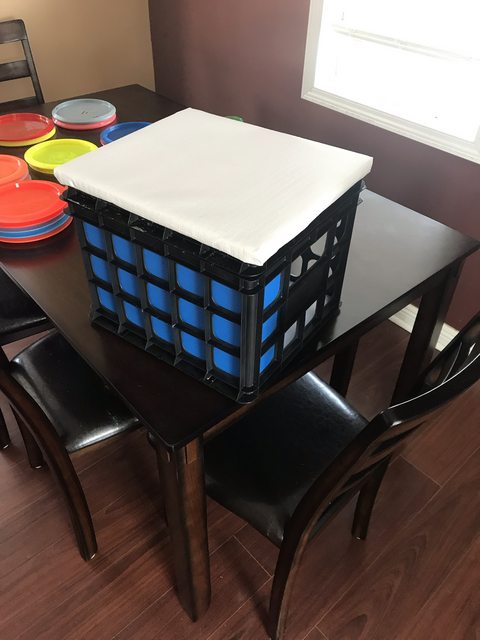
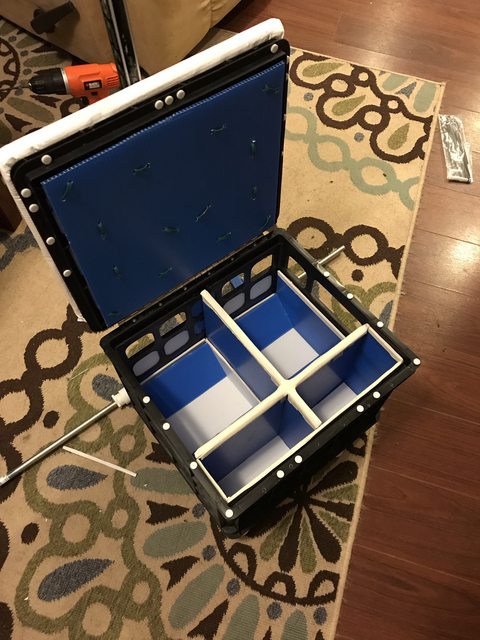
- The top is the bottom of a second basket (these baskets stack nicely) with most of the basket sawed off. I attached the the top with a 12" continuous hinge. Fits very nicely. The seat is a couple pieces of 1" foam glued together and wrapped in white plastic sheeting (it's the stuff you can put in your kitchen cupboards that hold dishware in place; this may get another layer of something more durable down the road). The foam part is screwed onto the top.
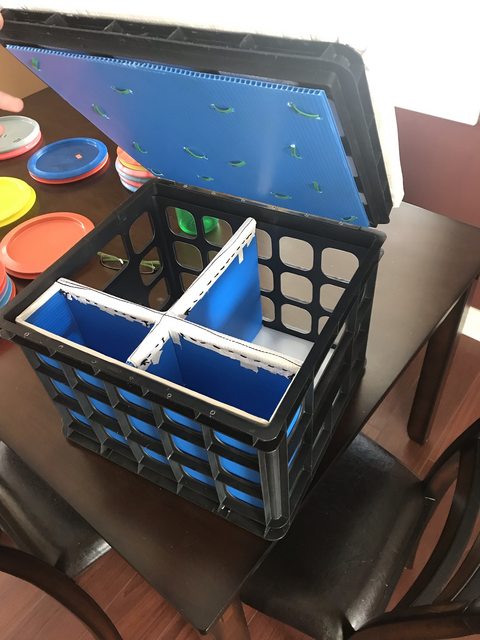
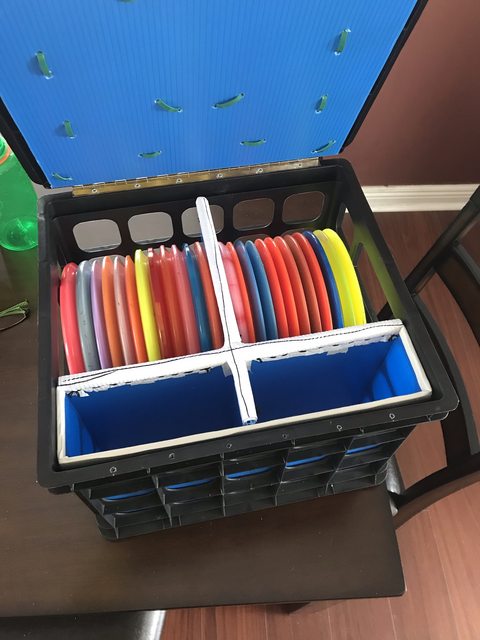
- The bottom is a complete, unaltered basket. The cross-divider-bracing in the compartment is made from corrugated plastic, a couple pieces glued together and cut to size. More plastic surrounds the storage compartments, and rests on the bottom. The "jankiest" looking part is this cross piece, at the moment, as I sewed some of the white plastic sheet to the top (to add a little structure, integrity, and to cover up the sharp edges of the corrugated plastic. The cross piece acts as addition support (carries some weight when sitting on it). As is, I fit 24 discs, including 6 mids and 3 putters.
- Moving forward, I plan to put some corrugated plastic pieces in the square holes (might make it look like a Rubix cube, since I am into that also, or just one or two colors... we'll see). I will make a "dolly" out of [mostly] PVC pipe (probably 1") and attach the basket to it to comprise a cart. I may try to incorporate a hockey stick as the vertical handle extension, but we will see.
TLDR; I'm making a DIY cart out of various materials. This is the first installment/update that consists of creating the foundation of the basket. I still have plenty of work to do. It fits 24 discs and I can sit on it.
I have been wanting to make a DIY cart for some time. I decided to take the plunge and started making one. This is what I have so far. I'll preface with: I like the structure/look of the Delta. The Zuca does nothing for me. My opinion.
I started with a couple baskets I found at Menards. The dimensions were on par for what I wanted the size to be. Also some PVC (not used yet, might end up not...), corrugated plastic board, foam, plastic sheet, etc. Sisnoot (the cat) was neither leased from or purchased at Menards. Used materials, so far, amount to ~$60. I still have to get the wheels...
About a week later, I have the beginnings of a main compartment
If interested, here is the Lowdown:
- The top is the bottom of a second basket (these baskets stack nicely) with most of the basket sawed off. I attached the the top with a 12" continuous hinge. Fits very nicely. The seat is a couple pieces of 1" foam glued together and wrapped in white plastic sheeting (it's the stuff you can put in your kitchen cupboards that hold dishware in place; this may get another layer of something more durable down the road). The foam part is screwed onto the top.
- The bottom is a complete, unaltered basket. The cross-divider-bracing in the compartment is made from corrugated plastic, a couple pieces glued together and cut to size. More plastic surrounds the storage compartments, and rests on the bottom. The "jankiest" looking part is this cross piece, at the moment, as I sewed some of the white plastic sheet to the top (to add a little structure, integrity, and to cover up the sharp edges of the corrugated plastic. The cross piece acts as addition support (carries some weight when sitting on it). As is, I fit 24 discs, including 6 mids and 3 putters.
- Moving forward, I plan to put some corrugated plastic pieces in the square holes (might make it look like a Rubix cube, since I am into that also, or just one or two colors... we'll see). I will make a "dolly" out of [mostly] PVC pipe (probably 1") and attach the basket to it to comprise a cart. I may try to incorporate a hockey stick as the vertical handle extension, but we will see.
TLDR; I'm making a DIY cart out of various materials. This is the first installment/update that consists of creating the foundation of the basket. I still have plenty of work to do. It fits 24 discs and I can sit on it.
Casey 1988
Shun the frumious Bandersnatch!
Took out post... it is just above
Okay so for handle is that a hockey stick without the bottom part, the kind that take an special bottom puck hitting part and fit in the straight part that hits puck or a full one piece hockey stick with puck hitting part of stick cut off?
Last edited:
Okay so for handle is that a hockey stick without the bottom part, the kind that take an special bottom puck hitting part and fit in the straight part that hits puck or a full one piece hockey stick with puck hitting part of stick cut off?
I would cut off the blade and just use the shaft. I'd have to figure something out to make an actual handle on top.
Casey 1988
Shun the frumious Bandersnatch!
I would cut off the blade and just use the shaft. I'd have to figure something out to make an actual handle on top.
I did not know technical terms, sorry. They do make just the Shaft that takes a separate blade and not just a Street Hocky set. Could use the Shaft to the top and just put Hokey/sports tape on the handle part.
Casey 1988
Shun the frumious Bandersnatch!
I have some ideas. And I have a bunch of sticks laying around. Ones probably busted enough to retire it.
I could too, a Street hockey stick that has not enough bottom blade. Though one could buy a street blade and take off the old one or at the least cut the old blade leaving a hole from old street blade connection part to put a new ice blade on it the cheaper wood ones that are just the blade and a little extra. I would not though and I would rather use a full size Spade Shovel handle with a Mountain bike handle grip at end or at least athletic tape as round to me is more comfortable.
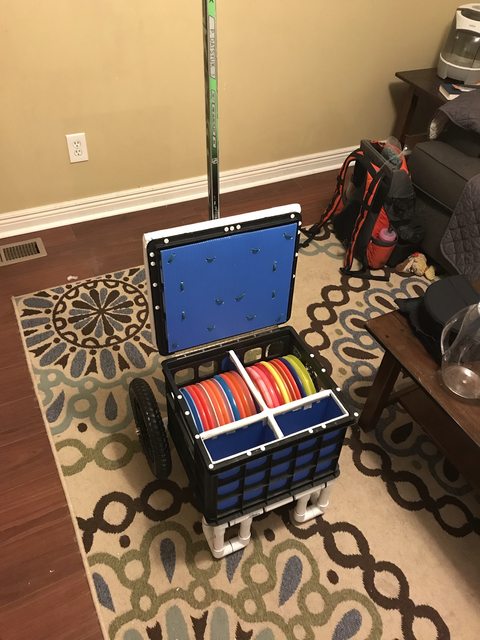
Part 2: Quick update.
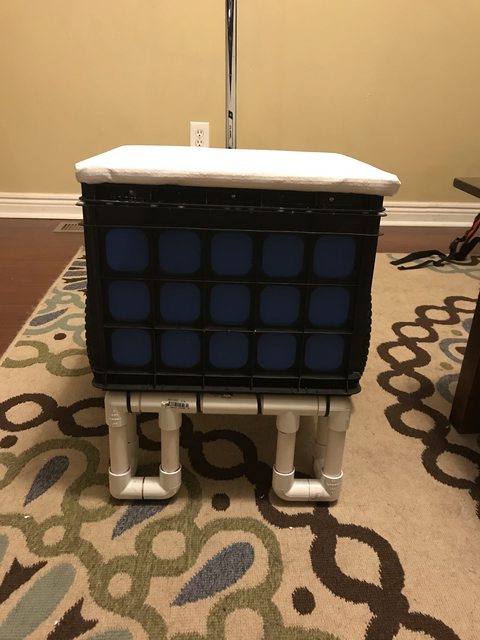
Got the main compartment frame finished. Hockey stick handle works pretty well. It is removable (for traveling) as it's attached by three machine screws. There is a little wiggle, so I will address that by adding more support. The PVC parts that the stick attaches to are cemented to prevent too much movement.
Made a few more mods to the inside, too, including disc channels for the two sides. Just to hold them a little more snug.
I ordered the wheels. Got these 12" wheels. Hoping they come sooner than later. Once they come, I will finish the front support legs, then the base will be done. I will most likely pretty it up (paint the visible PVC) at some point, also.
I made a 4 disc putter pouch some time ago (when I started making my own bag, but that didnt go far..) I plan to attach to the shaft for easy access. Also plan to add some storage to the back side (first pic, either side of the shaft attachment).
Cheers!
Last edited:
Casey 1988
Shun the frumious Bandersnatch!
Part 2: Quick update.
Got the main compartment frame finished. Hockey stick handle works pretty well. It is removable (for traveling) as it's attached by three machine screws. There is a little wiggle, so I will address that by adding more support. The PVC parts that the stick attaches to are cemented to prevent too much movement.
I will most likely pretty it up (paint the visible PVC) at some point, also.
Did you use the actual PVC Glue or Plumbers glue as it is called, stuff that is often blue or purple? If not then the Glue might have a chance to come undone or ruin the PVC. As for paint need to look for the kind that works on PVC often a spray paint and then clear coat spray to have it more durable because even the PVC stuff will come off over time.
Last edited:
I used some fishing lure dye on some PVC for a project and it seemed to work ok. Might be worth a try.
Casey 1988
Shun the frumious Bandersnatch!
Fortunately I used PVC primer and cement. The primer is, indeed, purple.
Good, not using that PVC Cement and primer can ruin the PVC as I have said before.
Part 3: Base model is complete
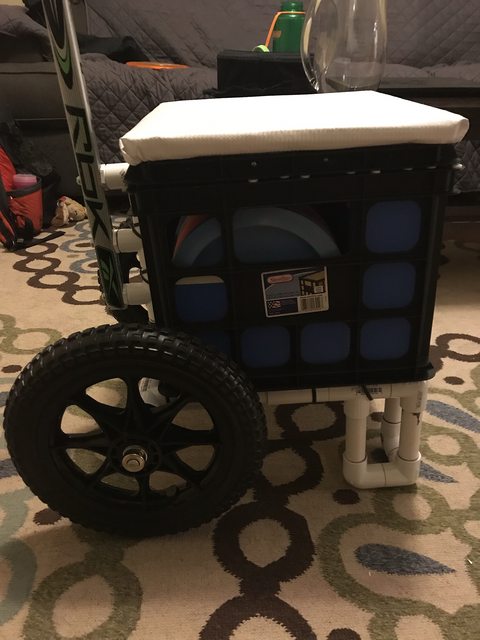
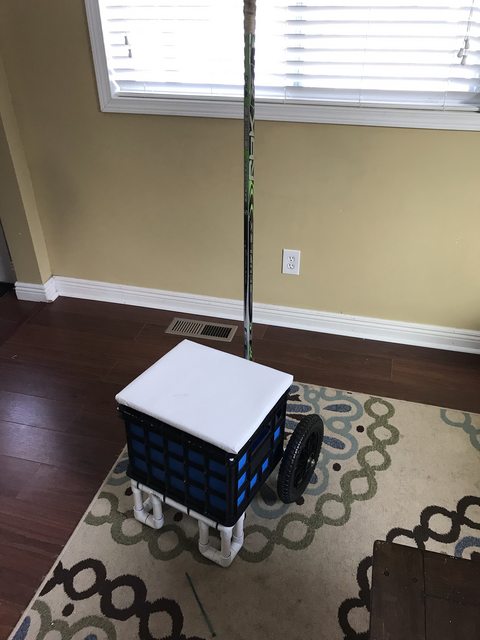
Can fit ~24 discs in the main compartment, I can sit on it, rolls nicely, the hockey stick handle is attached by three machine screws, so it can come off for transport, and its pretty light. I'd say I put about ~$125 into it (The wheels were $45 shipped... definitely the priciest part!).
Moving forward:
- I may shorten the front support legs (cut a middle segment out and use a couple). I thought the PVC pieces would go into the fittings more, but they didn't, so the cart kind of slopes backwards (but not enough to make it tip at all, still stable).
- I will create an attachment for my homemade putter pouch, to attach it to the handle for easy access and 4 more disc capacity.
- May add a "handle" part to the top of the shaft, but, just messing with it, I am not sure it's the most necessary thing.
- Will add a another layer of 'something' to the seat top, most likely something a little more wear resistant and waterproof.
- I may paint the PVC, or at least sand off the visible bar codes.
- The discs do move a little and make some noise, so I may add a soft layer to the channel to make it a bit quieter.
- Will add a cup holder on the back, some external storage to the back of the basket, and overall structural integrity/support as I see fit.
Thanks for following!
Last edited:
Casey 1988
Shun the frumious Bandersnatch!
I like how the cart is coming along.
For the handle I would cut it and make a sleeve using one of the toppers for a hockey stick cutting the top open for rest of handle part to fit into.
For the handle I would cut it and make a sleeve using one of the toppers for a hockey stick cutting the top open for rest of handle part to fit into.
Last edited:
Similar threads
- Replies
- 18
- Views
- 3K
- Replies
- 9
- Views
- 2K
- Replies
- 1
- Views
- 232
- Replies
- 0
- Views
- 172