• Discover new ways to elevate your game with the updated DGCourseReview app!
    It's entirely free and enhanced with features shaped by user feedback to ensure your best experience on the course. (App Store or Google Play)

Okthrowberfest: "How It's Made"...

hurricane7

Par Member
Joined
Aug 7, 2013
Messages
192
Location
Sonora, CA
Greetings everyone,

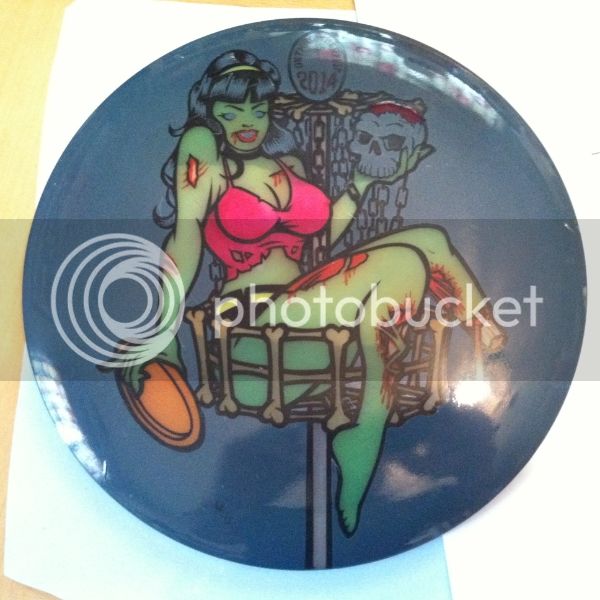
I'm sure there's a lot of you out there, like myself, that are wondering just how some of the entries in this years (or for that matter, other years) Okthrowberfest were made. I know I have lots of questions. What dyes were used? How was your stencil cut? Where did you come up with the design/concept? What disc or type of plastic was dyed? Etc!

Since I'm asking, and since I had my first entry this year, I may as well start it off and show some of the process I went through to make mine. I have learned a ton about dyeing discs from this forum over the last year or so. Now, maybe I can contribute, and maybe inspire others to get involved, or just answer some questions if anyone had any for my entry. Here goes...

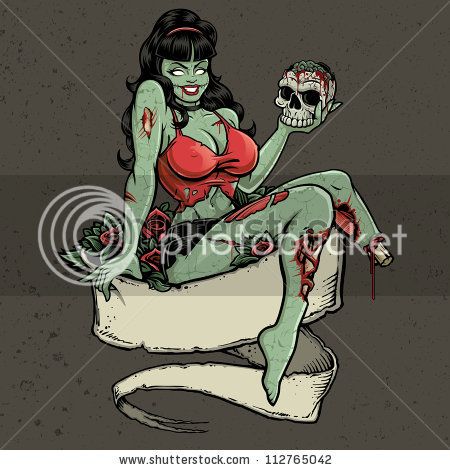
When I started thinking about what I wanted to do for my entry, I knew I wanted to go with a "Halloween" type theme. I'm also a big fan of pin up style, or WWII nose art. It also had to include elements from the game itself, and the name of the contest. After a lot of time spent on Google, I found this...
stock-vector-zombie-pinup-girl-holding-skull-vector-illustration-of-a-sexy-zombie-pinup-girl-holding-a-skull-112765042_zps713a0e59.jpg


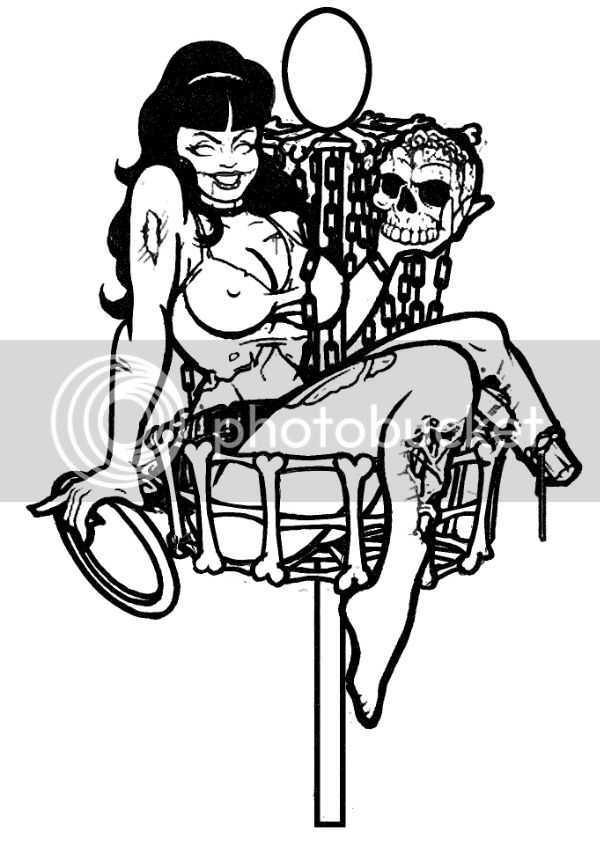
After a lot of sketching, scanning and more sketching and scanning, I finally ended up with this rough draft pattern...
octhrowberfest3_zpsbb6bd2e5.jpg


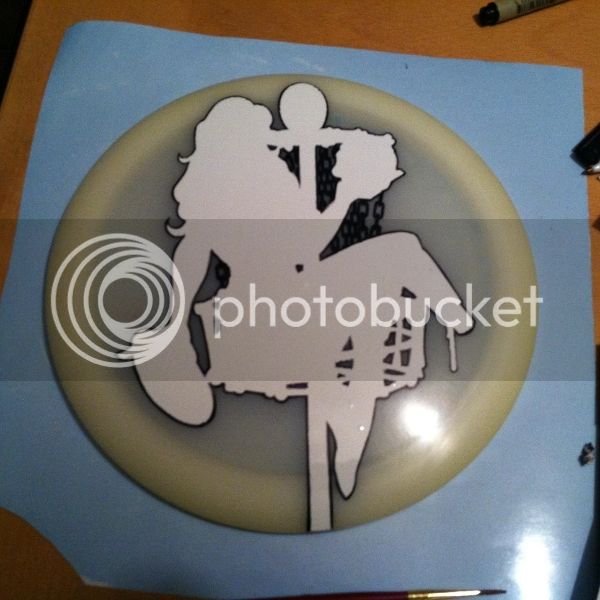
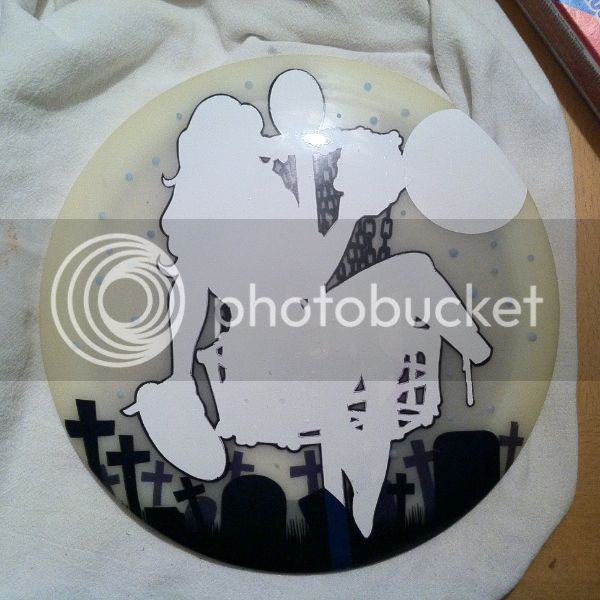
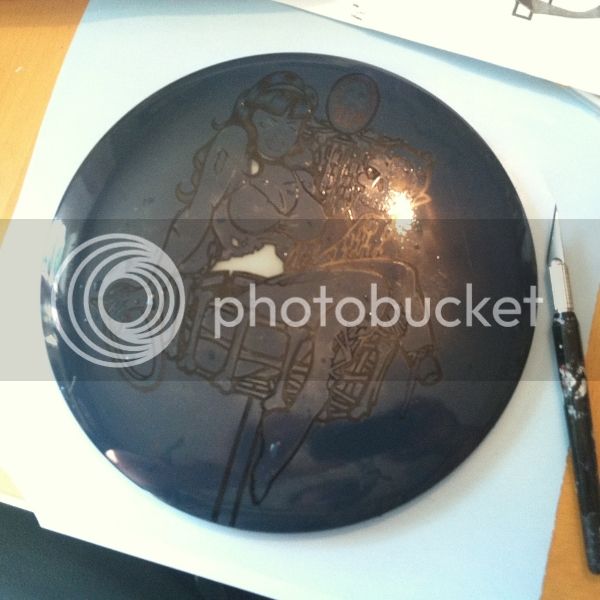
After some fine tuning and scaling, I wasn't satisfied with how the image was transferring to vector format, so I decided I would cut by hand instead of using a plotter this time. This would be my first time cutting on a disc. I transferred the pattern to my vinyl covered Glow Champion Roadrunner with Saral charcoal transfer paper, and got to cutting. After cutting the black outlines, I did a hot dip in a mixture of RIT and I-Dye black. (A combination of the "warm" RIT and "cool" I-Dye blacks make a nice dark, rich black) I didn't get any shots before dyeing the black, but here she is right after...
IMG_4832_zpsb09c395f.jpg


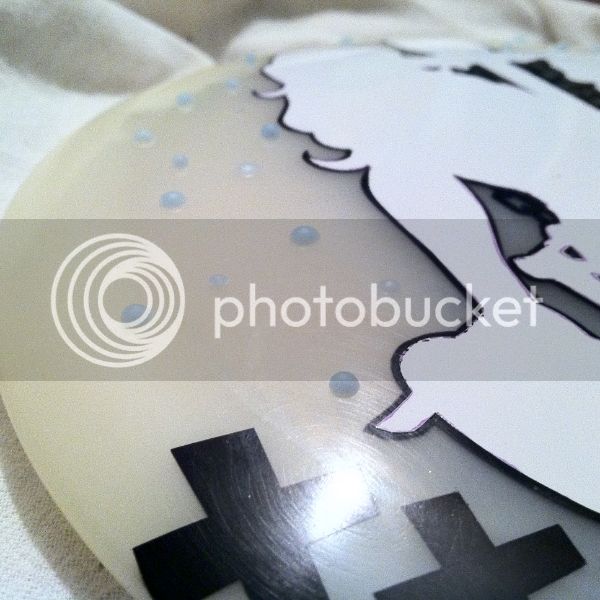
Ready for some skin now, I would also hot dip the green...
IMG_4834_zps65b3e5d5.jpg


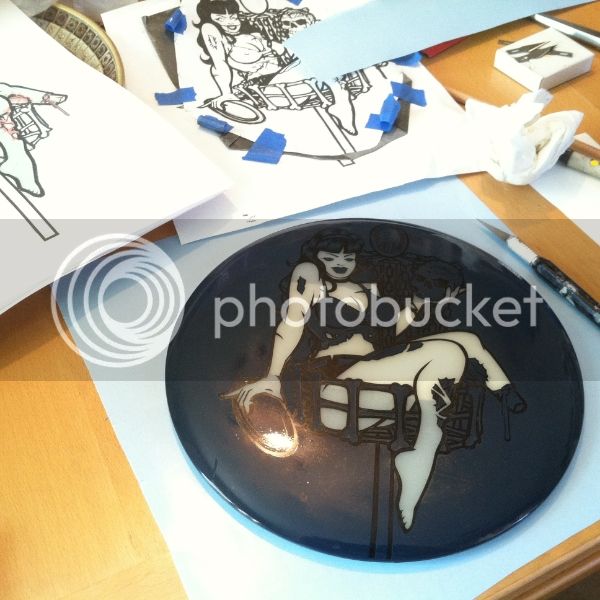
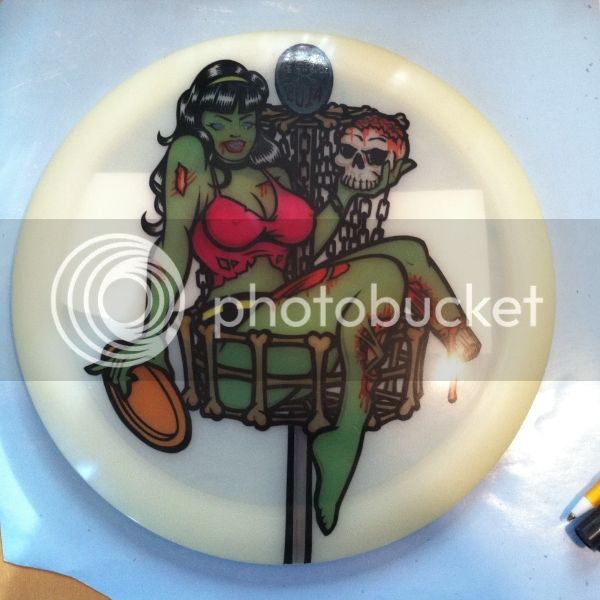
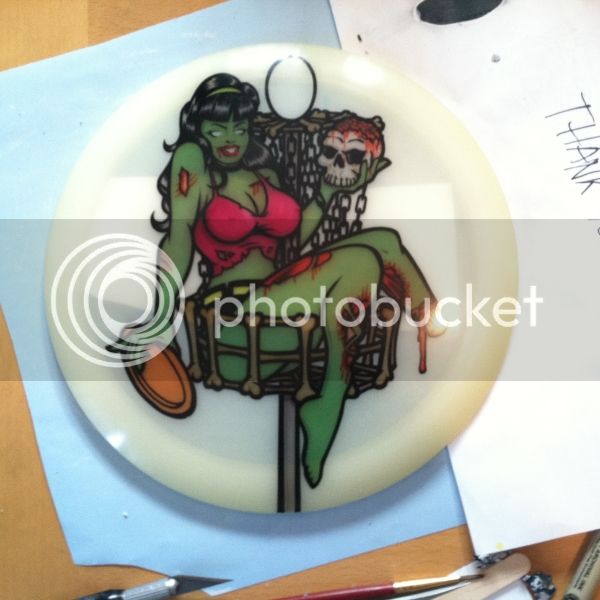
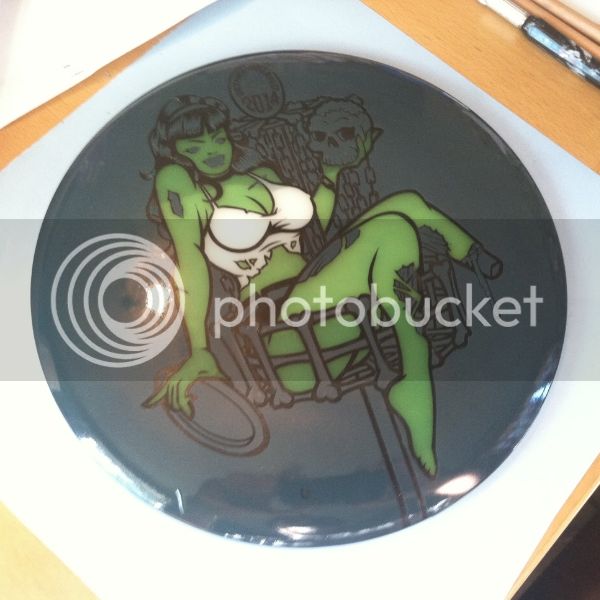
After hot dipping the green, I would brush each color. I used dyes mixed in clear laundry detergent for the most part. Added a touch of acetone for some of the colors that I wanted to be deeper. Brushed on thick, and left to sit for just minutes, or sometimes overnight, depending on what I wanted. Here, the mask is ready for the color of her top. I really liked the top when it was white, but I knew I wanted bright colors throughout the disc, and didn't want to draw focus to just one part...
IMG_4836_zpse891db32.jpg
 
Here she is after applying color to the top...
IMG_4841_zpsf852c7c9.jpg


Still adding color, this shot shows what the detergent/dye mixture looks like after it is brushed on (the brain on the skull)...
IMG_4889_zpsfa91acad.jpg


This pic is after I started adding some shading, shadows and highlights. All were brushed on...
IMG_4890_zps4effeb4c.jpg


This is with all the vinyl masking finally removed. Always one of my favorite moments of a dye. This is where you really see it coming together. Most of the shading is done, but I would add more after the other elements were in place...
IMG_4893_zps51960804.jpg


Getting ready for the background. This was a somewhat anxious moment, because as some of you know, any time you cover dyed plastic with vinyl, some of the dye will be lifted out when the mask is removed...
IMG_4895_zps8f48a098.jpg
 
I didn't take any photos of the cemetary process. It was a two stage hot dip in the black mixture with more hand cut vinyl masking. I wanted to add stars, and at this point, I was running out of time. Hand cutting would have taken too long, so I improvised. I used a birthday cake candle and a toothpick. I "grabbed" each drop of wax from the candle with the toothpick and transfered it to the disc while it was still liquid...
IMG_4899_zpsccf5d12f.jpg


It took a little practice, but once I got it down, it went quickly...
IMG_4901_zpsd0ce52f7.jpg


This is what the shaving cream bed looked like before plopping the disc in. After sitting in the "bath" for around 18 hours, I pulled it and rinsed. I thought the white clouds would blend with the sky color, but they didn't. They ended up way too white, so I made another bath with the same sky colors, without clouds, and let it sit for another 3 hours to tone down the clouds. It ended up working just how I wanted it to...
0fbf4bf5-090b-4648-b252-591ca9e61ade_zps27e98f91.jpg


I ended up changing the color of the disc in her hand because it was too close to the color of the sky behind it. I also added some more shading, and the lettering for the basket plaque was done with brush and black worm dye. That's it! Here is a list of the colors I used...
OKcolors800_zps99117192.jpg
 
Awesome. Thanks for giving us this inside look at how this sweet dye was made. (This was one of those "wish I could vote for more than three" dyes)

Edit: Wow, I posted before you posted the rest. So much work went into this! Great job.
 
I'd love to see what others did with their entries for Okthrowberfest. Please share if you want!:D

I'd also like to hear any feedback, or critisism anyone may have about my work. I've learned SO much from this forum and all the folks that contribute their knowlege. I hope I can contribute more in the future. I'm still learning! I had a great time keeping up with Okthrowberfest, and I'm already thinking about entries for next year. With the level of talented entries this year, I better start working NOW! :D

Peace, all
-Jeff
 
Thanks for the walkthrough Hurricane, that was very insightful!

Dyeing to Play, I'd love to know how you acheived such detailed lines on Lycanus.
 
Thanks for putting this write up together. I always am wondering on these multiple color dyes what order people are doing them in. Great ingenuity on this one! Awesome work with the candle wax too. I imagine hand cutting those chains was a bitch!
 
I love the great work, just curious and getting interested in this topic...do many people play with these great looking discs? I'm guessing people make doubles if it turned out great but how long does the dye last when thrown? Also, do you use anything to coat the dye when finished to "set" the dye or create a more permanent dye and retain the vibrant original color?
 
I love the great work, just curious and getting interested in this topic...do many people play with these great looking discs? I'm guessing people make doubles if it turned out great but how long does the dye last when thrown? Also, do you use anything to coat the dye when finished to "set" the dye or create a more permanent dye and retain the vibrant original color?

I've always heard that freezing your discs in the freezer for 24 hours'ish helps the dye to set into the plastic. Not sure if there is any validity to that but, I usually do it for the heck of it with most of mine when done.

I won't be throwing my contest disc mainly because I have other discs I prefer in my bag that I throw better with. Probably just make a wallhanger out of it unless I get an offer on it.
 
Great write up and pictures to boot! I think I have a pic of Murder of Crows after the initial black dip, I will find it and post here.
 
Thanks for putting this write up together. I always am wondering on these multiple color dyes what order people are doing them in. Great ingenuity on this one! Awesome work with the candle wax too. I imagine hand cutting those chains was a bitch!

Chains were really not that much of a pain. I'd say the biggest PITA was getting all the glue from the vinyl off every time I peeled some up! Especially on the smaller pieces! I don't seem to have that problem when using a plotter cut stencil. I guess the pressure from cutting the vinyl on the disc is the cause of it. I tried running the disc under warm water before peeling, and that seemed to help a little, but not as much as would have liked. I found that "rolling" the glue off with an eraser work better than anything else.

BTW, Odyssey, I caught your post about wanting to buy "Full Moon Feast" in the other thread. If you want, you can send me an offer via PM. Just know that she'd be hard for me to let go. Worst I could do is say "no". :D Also, thanks for all of your kind words about my work. I think you and I have learned a lot (especially about dyes) from each other. Well, at least I've learned from you! Thanks!

Peace,
-Jeff
 
I love the great work, just curious and getting interested in this topic...do many people play with these great looking discs? I'm guessing people make doubles if it turned out great but how long does the dye last when thrown? Also, do you use anything to coat the dye when finished to "set" the dye or create a more permanent dye and retain the vibrant original color?

I've thrown every disc I've dyed. Well, at least the ones I did for myself. I don't think I'll be throwing "Full Moon Feast" though. ;)

I've never used anything to "set" or protect the dye. I've wondered if some have though. Some photos I've seen look as if they have been clear coated, or at least polished. Might have to experiment with that.

Peace,
-Jeff
 
Great job, hurricane, on the instructional and on an awesome disc! Thanks for sharing the step by step.
I don't have any pics, but my two dyes were both totally painted with acetone and various mixes of Idye black, red, brown, green and yellow. The best way to describe the painting process would be very similar to watercolor painting. Since it is nearly impossible to remove dye/acetone once it's down, the colors need to be 'built up' from light to dark rather than just boldly laid down. Painting is done in several layers working from general to specific. You can always make something darker if it needs it, but it's hard to make a color lighter once it's down. In the baby's face, for example, the highlights and lightest tones are laid down first followed by shading from lightest to darkest areas and then details like eyelashes/eyebrows and pupils can be put down over the top. If the details are done first, they end up getting 'smeared' and bleed into surrounding areas. Most of the shading is done with small brushes laying down color and then dipped in clean acetone and used to feather out edges. The smallest details are painted with a very fine lining brush. The only masking used is wood glue for the highlights in the eyes (both dyes) and contact paper over the baby while I airbrushed the background (did the background first on that one).
Quick background on 'Hand'... I first saw a B&W version of the creepy image back in June in the Landfill in the 'stupid' pictures thread. Even there people were pretty creeped out by the image even though it was clearly photoshoped and the hand was a plastic prop. I cringed when I first saw it and then I giggled to myself while I wondered if I could put it on a disc.
 
DTP,
Thanks, and thanks for sharing how you did yours! Once again, GREAT WORK! It looks like The Hand That Feeds was done on a Gold Line disc? Can't tell on Lycanus. What discs are they done on?

Peace,
-Jeff
 
I also have a couple of questions for anyone that dyed a glow disc...

What plastic/mold did you use?

More importantly, How did you photograph yours?

Full Moon Feast was done on a Glow Champion Roadrunner, and I tried SO hard to get a good shot of it glowing, but was unsuccessful. :mad:

Would any of you be willing to post how, and with what equipment you took your shots with? I'd appreciate it!

Thanks,
-Jeff
 
I am not a fan of dyed discs myself, but this write-up was very cool. Gives me a new-found appreciation for the dyers of the dg community. Very impressive, thanks for sharing.


___________________________________
 
Top