-
Discover new ways to elevate your game with the updated DGCourseReview app!
It's entirely free and enhanced with features shaped by user feedback to ensure your best experience on the course. (App Store or Google Play)
You are using an out of date browser. It may not display this or other websites correctly.
You should upgrade or use an alternative browser.
You should upgrade or use an alternative browser.
The Dye A Day Thread! (Part II)
- Thread starter Three Putt
- Start date
- Status
- Not open for further replies.
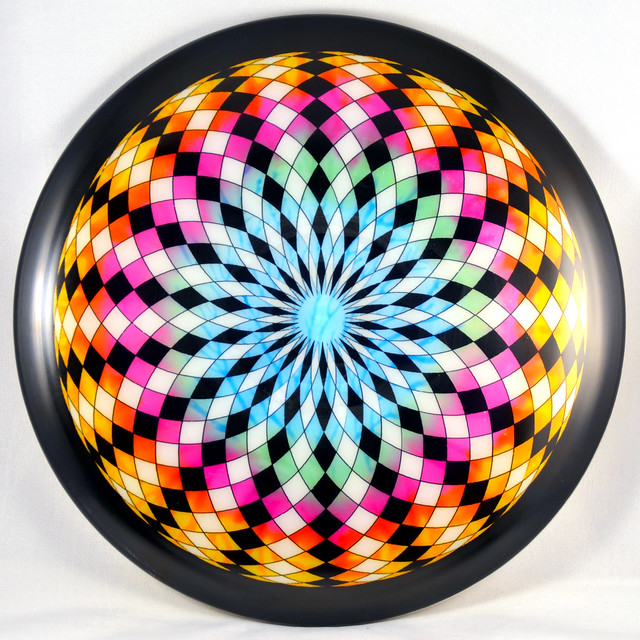
Well done, ngramly!
Did you weed the little black lines, or just leave them cut?
Great blend of color, and the wide black border really makes the design POP.
Did you weed the little black lines, or just leave them cut?
Great blend of color, and the wide black border really makes the design POP.
Well done, ngramly!
Did you weed the little black lines, or just leave them cut?
Great blend of color, and the wide black border really makes the design POP.
Thank you sir! The little lines are single cuts. Once I applied the vinyl to the disc, I flexed each of the seams to make sure each was open to the dye.
discguy42
Double Eagle Member
Thank you sir! The little lines are single cuts. Once I applied the vinyl to the disc, I flexed each of the seams to make sure each was open to the dye.
Simply awesome looking, reminds me of a Tiffany lamp. That looks soooo multidimensional and the black rim is a classy touch.
How long did that take to finish? Is that a brainwave/shaving cream dye underneath?
Last edited:
I have a few dyes done, but I can't post them yet, as they are gifts for others ") Will post at the end of the month!
Will post at the end of the month!
Will post at the end of the month!
Simply awesome looking, reminds me of a Tiffany lamp. That looks soooo multidimensional and the black rim is a classy touch.
How long did that take to finish? Is that a brainwave/shaving cream dye underneath?
Don't mean to pummel you with questions, but I would also like to know what method you used for the color, and if you did all the colors at once. There does look like there are some blue brainwave lines in there...
Anyways, stellar job :hfive:.
Duff-Dyed
Par Member
I have a few dyes done, but I can't post them yet, as they are gifts for others
thats the worst. i can't ever post dyes to my page until i know the owner has gotten their mail
hurricane7
Par Member
Thank you sir! The little lines are single cuts. Once I applied the vinyl to the disc, I flexed each of the seams to make sure each was open to the dye.
Love that style ngramly! I've been wanting to try something like that after seeing some of your other ones.:clap:
One more question...if you don't mind...
Is the black outer ring spun or dipped with the rest, and if it's the latter, how are you centering your stencil?
Thanks!
-Jeff
FadedThrows
Newbie
Just put a Tiger Camo dye on my PA-2.
 [/URL][/IMG]
It took longer than I originally thought but still probably less than a lot of the hand-painted work I've seen on here. It feels like it takes forever because 90% of the time in it is spent tediously weeding all of the tiny shapes. The background is all brainwave-style punky colour but only the blue really showed up.Simply awesome looking, reminds me of a Tiffany lamp. That looks soooo multidimensional and the black rim is a classy touch.
How long did that take to finish? Is that a brainwave/shaving cream dye underneath?
Brainwave-style using punky colour for all of the colors done in one step. I left the dye on for 48hrs in a semi-sealed environment with damp paper towels. I feel like this helped the color come through brighter but it may have blurred the brainwave lines in everything but the blue.Don't mean to pummel you with questions, but I would also like to know what method you used for the color, and if you did all the colors at once. There does look like there are some blue brainwave lines in there...
Anyways, stellar job :hfive:.
The outer ring is dipped with the rest of the black. Since all of my geometric stencils are designed in AutoCad, I include a small hole at the exact center of the design. I line up the stencil through that hole to a temporary mark I make on the center of the disc. Once everything is lined up and pressed down I cover up the hole with another piece of vinyl.Love that style ngramly! I've been wanting to try something like that after seeing some of your other ones.:clap:
One more question...if you don't mind...
Is the black outer ring spun or dipped with the rest, and if it's the latter, how are you centering your stencil?
Thanks!
-Jeff
I hope these are the answers you guys were looking for. Thanks to everyone for the kind words!

Duff-Dyed
Par Member


Odyssey113
Birdie Member
- Joined
- Aug 5, 2013
- Messages
- 348
still messing w nebula tests... going to pick up dish gel this week. do you guys use pinky colors w this method?
You dyed that boss...Like a BOSS!!! Awesome blend. I like it!
I havent used punky colour with this method. I dont use punky just cause of the feedback from others I heard on this site that it fades quite a bit.
Duff-Dyed
Par Member
thanks a lot guys, its going to be in my retail partners store this saturday along w the anode... i hope it sells. i had a buyer 15 mins after i put it on my fb but she backed out for what ever reason... I've had mixed reactions to it so...
still looking for a neon pinko type color to use... I'm leery of the punky colors as well, because of the fade issues. pylams bright pink is too pastel, and the red is not neon enough.
still looking for a neon pinko type color to use... I'm leery of the punky colors as well, because of the fade issues. pylams bright pink is too pastel, and the red is not neon enough.
still looking for a neon pinko type color to use... I'm leery of the punky colors as well, because of the fade issues. pylams bright pink is too pastel, and the red is not neon enough.
I've never tried it, but some people on here have used Worm dye for nebulas, and worm dye pink is by far the brightest, most neon pink I have seen.
Here's a Sirius Aries.
I have no strong feeling on the background - don't really like it, don't really dislike it. It was prochem bright yellow, bright blue, and turqoise....But it's definitely the best stencil I've done yet, and I love how easy the shading was.
Mad props to the actual artist that drew the design I used for the stencil.
Attachments


- Status
- Not open for further replies.
Similar threads
- Replies
- 45
- Views
- 4K